The Font Explorer
|
|
Home |
 |
Back To Tips Page |
|
|
The Font Explorer |
|
The Font Explorer is an updated version of the tool that was part of the Win32 Programming book. It is greatly expanded and updated. This version was built under VS 2005.
 This
is actually a derived class of CFontDialog. I probably could
have rewritten it to be done as another view, but there was a limited amount
of time budget for working on this program, and I did not want to make a
truly massive change. This
is actually a derived class of CFontDialog. I probably could
have rewritten it to be done as another view, but there was a limited amount
of time budget for working on this program, and I did not want to make a
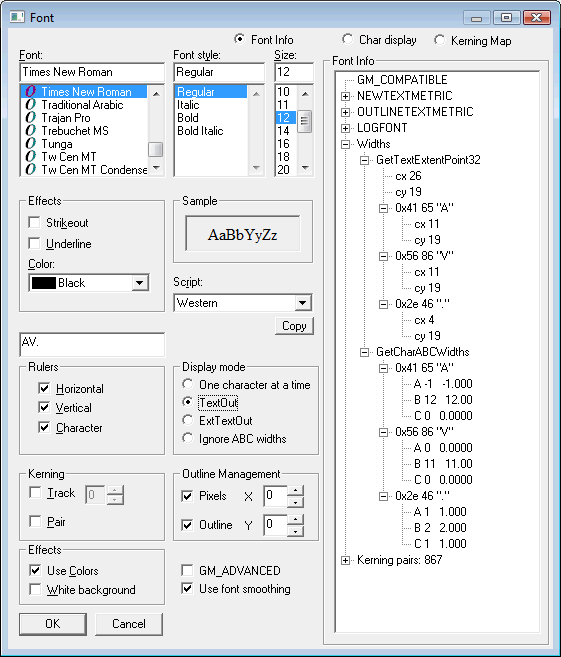
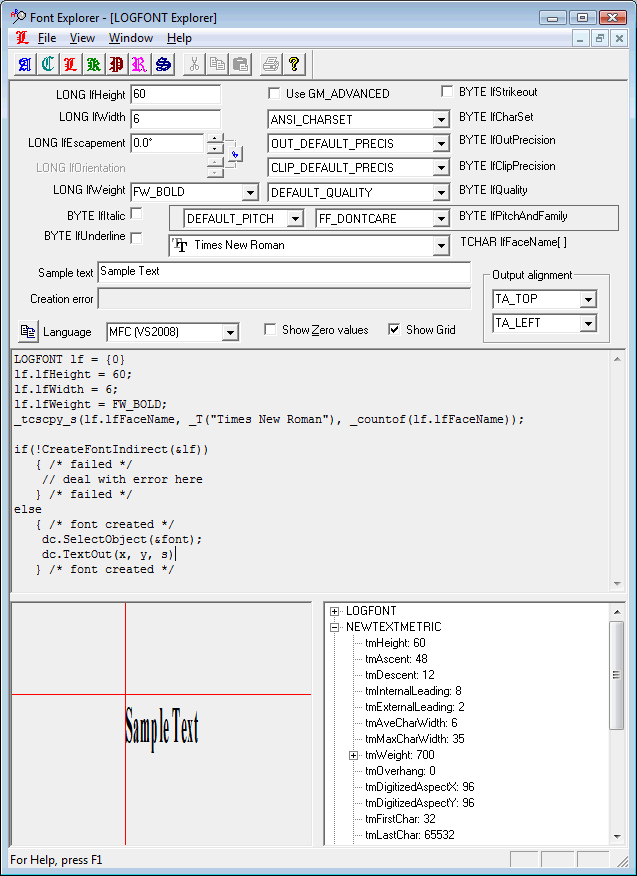
truly massive change.The options are basically the options of CFontDialog. But I've added custom controls to it. The box on the right is what is displayed when Font Info is selected. It shows the NEWTEXTMETRIC, OUTLINETEXTMETRIC and LOGFONT structures, as well as the widths for the sample text as reported by GetTextExtentPoint32, and the ABC widths reported be GetCharABCWidths and the floating point versions from GetCharABCWidthsFloat.
The various rulers can be shown or hidden by selecting options in the Rulers control box. Superimposed on the pixels is an outline of the font. This is done by scaling the font up to the height of the display image. This results in some nonlinearities which will cause the outlines to not quite match the pixels. The Outline Management allows the overlay image to be offset slightly so that it more-or-less matches the pixels. The idea here is to show how pixelization matches the outlines. In GM_COMPATIBLE mode, the image can only be offset by 1 pixel intervals; in GM_ADVANCED mode finer control is possible The choice of displaying the pixel map or just the outlines can be chosen by the two check boxes in Outline Management. If both are unchecked, there is no character display. The Display Mode controls how the text is actually drawn. In One Character at a time mode, the layout is done by emulating the font layout (note this does not work for complex script fonts! And I don't have time to learn UniScribe to fix it). The TextOut and ExtTextOut select those modes. The Ignore ABC widths option is used to illustrate the graphical effects of how the pseudo-kerning of the ABC widths changes the layout. The use of track kerning and pair kerning can be selected using the options in the Kerning selection; if Track Kerning is selected, the control to set the track kerning (SetCharacterSpacing) is enabled. The options to Use Colors and White Background were added when I did Win32 Programming so I would have images that could be readily pasted into the book The button labeled Copy copies the image from the Font Info control to the clipboard; that's how the above image was created/ |
||||||||||||||||||||||||||||
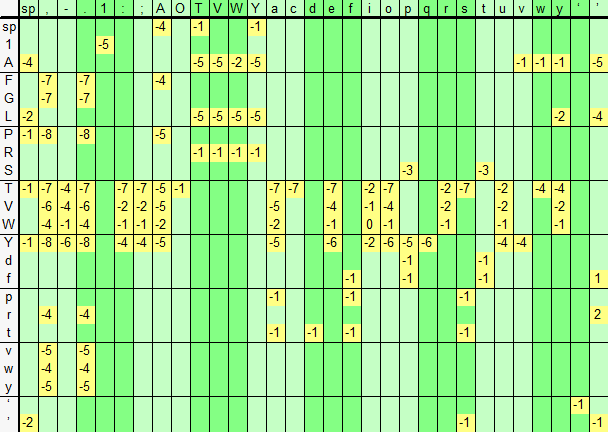 When
the Kerning Map option is selected, the kerning pairs are illustrated
graphically, as shown to the left. When
the Kerning Map option is selected, the kerning pairs are illustrated
graphically, as shown to the left.This is for a 48-point Arial font. Note that kerning values will change based on the font size, the graphics mode (GM_COMPATIBLE or GM_ADVANCED), and other parameters. Note that some values appear to be 0 (such as the Wi) pair shown to the left. All this means is that there are pair relationships for such character pairs, but in the current font and mode, those values are 0. The lower table is the same font, Arial, in 8-point size, and notice the kerning pairs have different values. The kerning table for Adobe Caslon Pro is massive, with 4312 kerning pairs, but it is by no means the largest; the font I have called "Constantia" has 20,444 kerning pairs! (Note that in these cases, I am using the Unicode version of the program) Some of the fonts shown below are those which are installed on my machine and are not standard fonts delivered from Windows. The one titled "Segoe Print" has only one kerning pair, a positive offset between t and l! |
||||||||||||||||||||||||||||
|
|
|
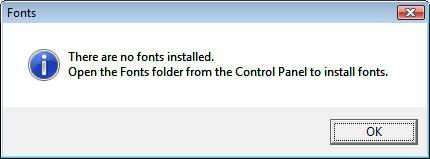
The
CFontDialog/ChooseFont explorer allows you to explore the options for
launching a CFontDialog. for example, to detect that if you
fail to set the right font selections (e.g., CF_BOTH, CF_PRINTERFONTS
and CF_SCREENFONTS all unchecked, you will get the
completely nonsensical error message
which is an error message so mind-bogglingly irresponsible that it is hard to imagine how it could have existed for so long. 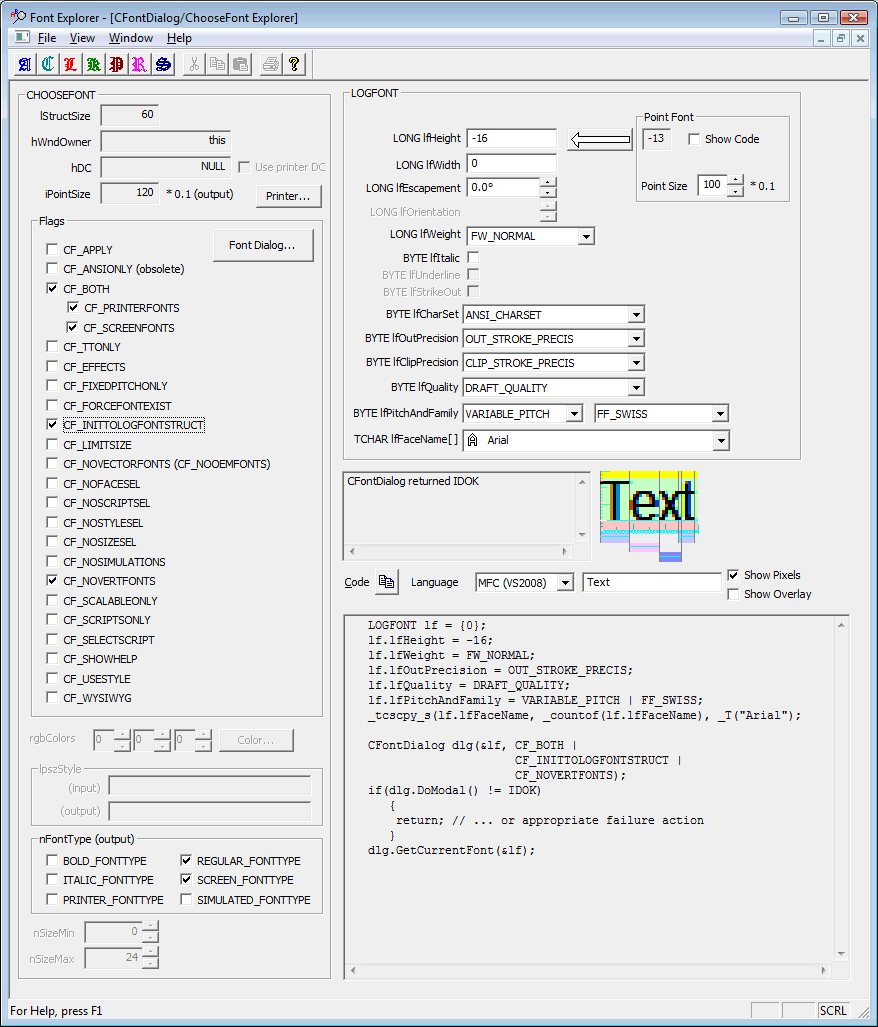 The method of operation is to select some options, such as the flags to set, the rgbColors (only if CF_EFFECTS is enabled), the lpszStyle (if CF_USESTYLE is specified), the nSizeMin and nSizeMax sizes (if CF_LIMITSIZE is specified), and the specifications of the initializing LOGFONT structure (if CF_INITTOLOGFONTSTRUCT is specified), click on the Font Dialog... button and see what happens. Sample text can be provided, and as in other contexts, the pixels, the overlay, or both can be set (although there is no provision made for adjusting the overlay position; if you need to do that, use one of the other pages). The use of a printer font on a printer can be done by clicking the Printer... button and getting a printer selection dialog, and this returns a DC for the printer. If the printer DC is set, the Use Printer DC button will be enabled. Using the controls in the Point Font box, a desired point size (e.g., 10 point) can be selected (which is expressed in tents of a point, so the value is shown here as 100). If the printer DC option is enabled, the resulting LOGFONT value for creating a font of that point size appears. The Show Code checkbox will cause the code required to compute the correct point size into the code example. The large arrow button will assign this value to the lfHeight value of the LOGFONT structure. Note that options like lfUnderline and lfStrikeOut cannot be selected unless CF_EFFECTS is checked. The code appears in a read-only edit control, and can be selectively
highlighted and copied. If the copy button
|
 This
illustrates the use of the LOGFONT structure to create a font.
Note that this creates a font with an explict lfWidth parameter,
which creates a tall, narrow font 60 units high and 6 units wide. This
illustrates the use of the LOGFONT structure to create a font.
Note that this creates a font with an explict lfWidth parameter,
which creates a tall, narrow font 60 units high and 6 units wide.The
various parameters of the LOGFONT structure can be individually
tweaked to create an effect. Ultimately, the code required to create
the LOGFONT structure and create the font appears in the edit
control. If the copy button The sample of the font is shown in the lower left, and with the Show Grid option, the position of the text relative to the nominal (x,y) point of the TextOut is shown. The Output Alignment can be used to select the SetTextAlign options for output. If the Show Zero Values option is selected, all the fields of the LOGFONT will have corresponding assignment statements in the code window; otherwise, only the nonzero values are shown being set. The Language indicates which version of the compiler is being used, version 6 or 2008, and whether the code is in C or MFC. The lower right shows a number of other parameters, such as the LOGFONT structure, the NEWTEXTMETRIC specification, the OUTLINETEXTMETRIC structure, and the kerning pairs. |
 A font with lfHeight=30
and lfWidth=90 A font with lfHeight=30
and lfWidth=90 |
 A font with
lfEscapement=450 and lfOrientation=0, with GM_ADVANCED
enabled A font with
lfEscapement=450 and lfOrientation=0, with GM_ADVANCED
enabled |
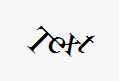 A font with
lfEscapement=0 and lfOrientation=-450 with GM_ADVANCED
enabled A font with
lfEscapement=0 and lfOrientation=-450 with GM_ADVANCED
enabled |
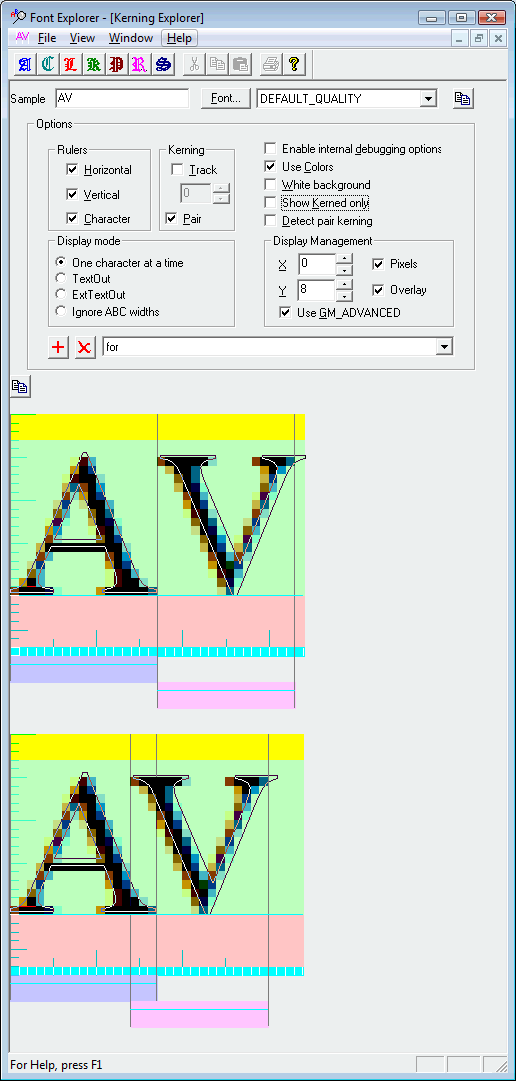 The Kerning
Explorer allows you to see the effects of applying track kerning and pair
kerning to the text. The Kerning
Explorer allows you to see the effects of applying track kerning and pair
kerning to the text.The sample text and quality are selected; the Font... dialog launches a standard font dialog. The Rulers option shows or hides the various rulers. The Kerning option allows selection of track kerning and pair kerning. The + key adds a sample to the dropdown, and the X key deletes the example. The examples are not saved and are lost if the window is closed. |
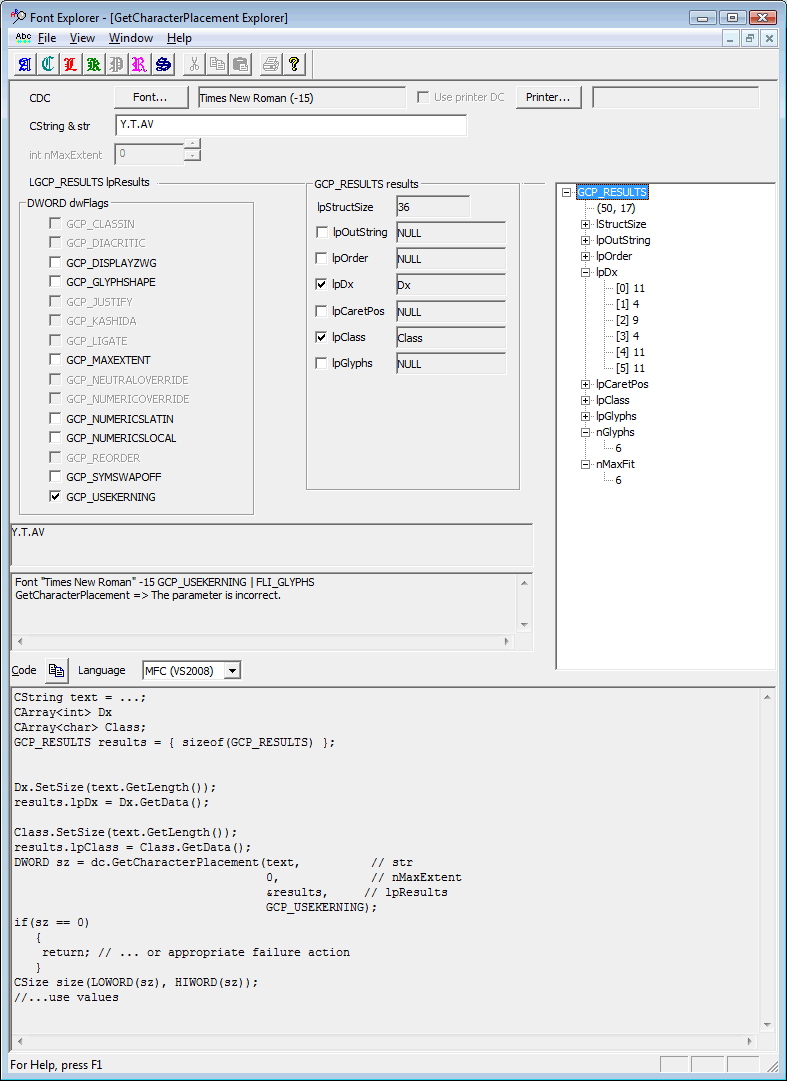 Although
GetCharacterPlacement is somewhat dated, and UniScribe has
pretensions to replacing it, UniScribe is so poorly documented and so
hard to use, that I still find that for Western fonts that this is still
usable. Although
GetCharacterPlacement is somewhat dated, and UniScribe has
pretensions to replacing it, UniScribe is so poorly documented and so
hard to use, that I still find that for Western fonts that this is still
usable.The flags can be selected, and some flags are disabled because the font does not support the options. For example, for a font that does not support kerning pairs, the GCP_USERKERNING would be disabled. The GCP_JUSTIFY flag can only be used if GCP_MAXEXTENT is selected and then the nMaxExtent value must be set to a nonzero value. The results appear in the tree control on the right. Due to some weird bug in the CTreeCtrl, the values sometimes get displayed off the left edge of the control, and you will need to resize the window to get them to reappear. No, I have no idea why this fails in this way. The code appears in the code window, a read-only edit control.
Pieces can be highlighted and copied, or the copy button
Various status messages are displayed in the status window, such as the currently selected font, its GetFontInfo flags, error messages from calling GetCharacterPlacement, the currently selected printer type, and so on. |
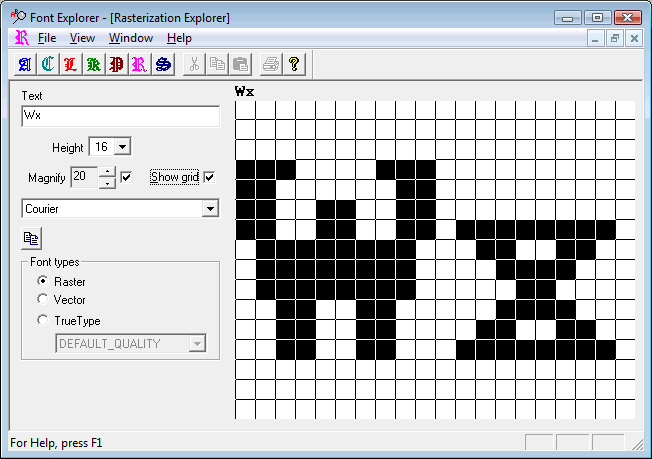
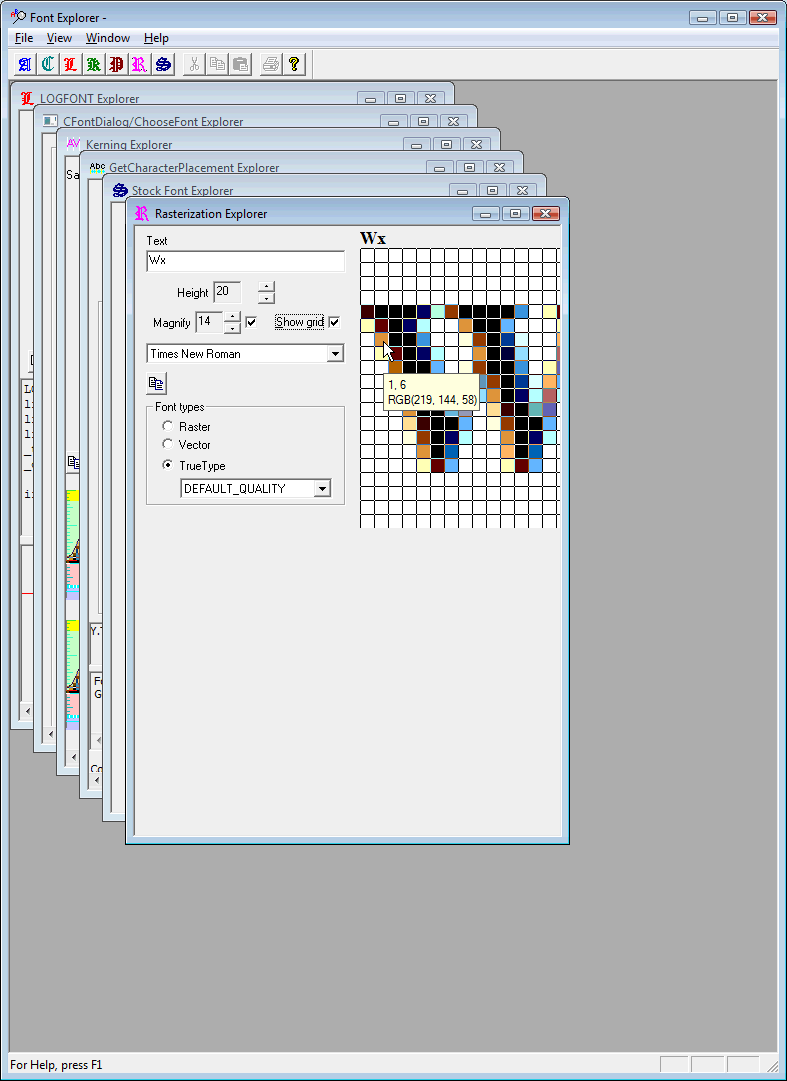
The Rasterization Explorer shows how the font is rasterized onto the DC. The two representations are shown on the right-hand side of the display; the topmost is always shown 1:1, and the height selected is 16, one of the possible font heights for Courier. The lower one is a magnified version; in this case magnified by 20×. The optional grid is also displayed. The font categories are Raster Fonts, Vector Fonts (now considered obsolete), and TrueType/OpenType fonts.
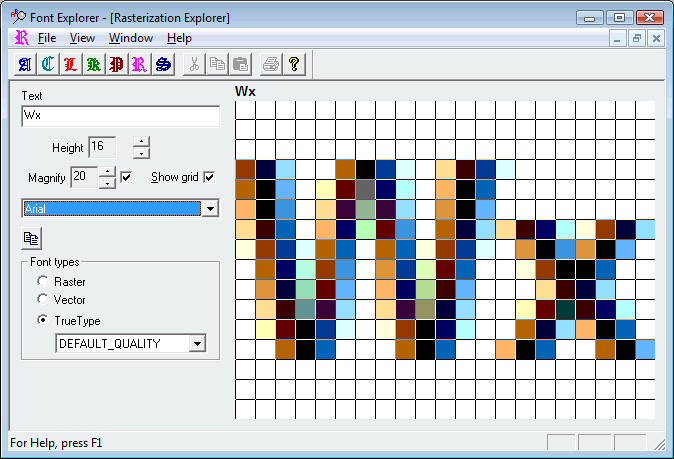
This is an OpenType font, Arial, shown at the same size and magnification. The default display configuration is ClearType. Note that the edges are done in colors. However, two other configurations of rasterization can be used.
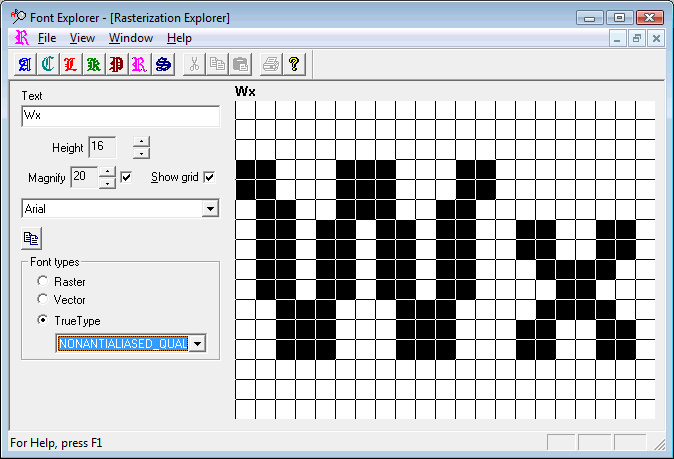
In this configuration, the font is rastersized using the NONANTIALIASED_QUALITY option; note there is no attempt to do any kind of smoothing.
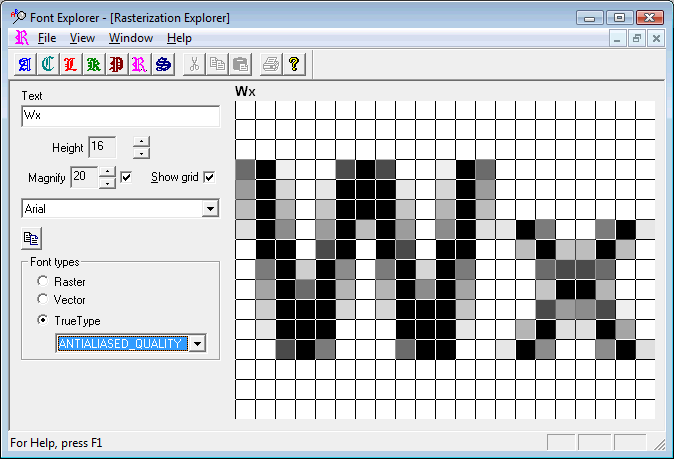
This font is rasterized using the ANTIALIASED_QUALITY option. Note that only shades of gray are used to achieve the apparent smoothing.
What fonts are the "stock fonts" and what do they look like? Here they are:
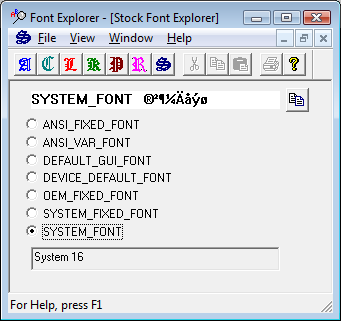
Note that the specific face names, sizes, and samples are snapshots on my machine; Your Mileage May Vary. That's why the program exists, so you can see what they look like on your machine. |
All windows except the basic Font Explorer window (which is a modal dialog) can be tiled or cascaded, and multiple instances can exist. This shows several active windows up, and also illustrates how placing the cursor over a color in the grid will pop up a tooltip giving the coordinates of the grid square, with (0, 0) at the top left corner, and also shows the color value used.

![]()
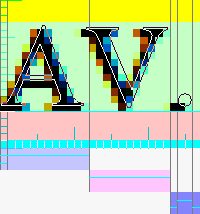 When the
Char Display option is selected, the character outlines will be
displayed in the right-hand box. The actual pixelization (which can be
explored in more detail in the Rasterization Explorer) is shown.
Along the bottom, rulers are shown indicating the pixels involved (this is
the 12-point font). The top color is the tmInternalLeading
value of the TEXTMETRIC structure. The middle color is the
tmAscent value, and the bottom color is the tmDescent value.
Along the bottom, there are the ABC rulers. The layout shows that
A has a -1 A-width, a 12-wide B width, and a 0 C width. The
period has A=1, B-2 and C=1.
When the
Char Display option is selected, the character outlines will be
displayed in the right-hand box. The actual pixelization (which can be
explored in more detail in the Rasterization Explorer) is shown.
Along the bottom, rulers are shown indicating the pixels involved (this is
the 12-point font). The top color is the tmInternalLeading
value of the TEXTMETRIC structure. The middle color is the
tmAscent value, and the bottom color is the tmDescent value.
Along the bottom, there are the ABC rulers. The layout shows that
A has a -1 A-width, a 12-wide B width, and a 0 C width. The
period has A=1, B-2 and C=1.