Printing Bitmaps
| Home | |
 |
Back To Tips Page |
 |
Printing Bitmaps |
|
I have finally seen one too many questions of the form
so I decided to write an example. That's how these essays usually happen.
This is a generalization of the "capture a bitmap to the clipboard" essay, which shows a simpler method.
This implements a special button of the class CCaptureButton. Click on this button and drag the mouse. The button will start blinking in alternating colors and display as its caption the window handle of the window you are moving over. In addition, the window itself will be outlined. The cursor will change to the appropriate cursor for the window. When you release the mouse button, the parent of the CCaptureButton will receive a BN_CLICKED notification, at which point it will be able to retrieve the bitmap of the captured window using the CCaptureButton::GetBitmap method.
The code to print the bitmap is taken directly from the MSDN ShowDIB example. You can get more complete documentation for it from the MSDN. The code to capture the window image is mine.
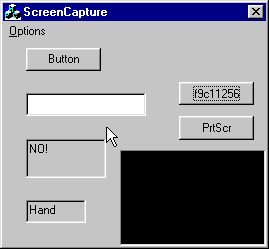
 Shown here is the little sample
application, capturing its own image. Note the cursor is shown!
This shows the set of sample windows: a button, an edit control, a black rectangle, and two read-only edit controls, one of which ("NO!") shows a x symbol and the other of which ("Hand!") shows a pointing finger G cursor. These cursors are obtained by having subclassed these two controls and creating an OnSetCursor handler to process the WM_SETCURSOR message.
| The menu options allow you to set a fill color for the bitmap; this is useful when you want to eventually create a .gif file with a transparent color. | |
| For example, to create this image I used a transparent red .gif.The use of the transparent color allows the background to show through behind the hand. The actual bitmap that was saved is this one. | |
 |
Here is an example of the "No" cursor hanging over the left and top of its window. |
 |
Note how the 32 × 32 nature of the cursor ends up with some extra space at the top and left of this cursor. |
| This shows the I-beam cursor in the edit control. | |
| The control image as actually saved in the bitmap. |
So how did I capture the cursor? It was a bit tricky.
This is a combination of the logic for capturing a window image (discussed in a companion essay) and code to capture the cursor.
There are some frills here. For example, I chose to implement this as a button which sets capture, and blinks as long as the capture is happening. Because I want to capture the actual cursor to be used, I can't use a bull's-eye or crosshair cursor, so I need some indication that the cursor is in "search" mode rather than in its normal mode. The blinking button provides this feedback.
As the cursor is moved around, the OnMouseMove handler is called for each repositioning. What I do here is use ChildWindowFromPoint to get a handle for the window under the cursor. This may fail if the window is not a child window, so if I get NULL, I do WindowFromPoint.
Next, I get the cursor data. This is not too hard, although it does not present itself immediately. You use the ICONINFO structure to do this (icons and cursors are actually the same basic data type)
      ICONINFO info;
      if(GetIconInfo((HICON)::GetCursor(), &info))
        { /* process it */
         ...
I then have to make some adjustments to the target bitmap into which I will
move the pixels to account for the fact that the cursor may extend beyond
the window edge. This means I may have to fill some area in. I'm not going to
include the tedious computations here; they are available in the
capturebutton.cpp file. Ultimately, I copy the source bitmap into the target
bitmap, then use DrawIcon to draw the cursor on top of it.
.
![]()
The views expressed in these essays are those of the author, and in no way represent, nor are they endorsed by, Microsoft.