
Using SetWindowRgn
|
|
Home |
 |
Back To Tips Page |
|
|
Using SetWindowRgn |
|
There are lots of interesting reasons for creating odd-shaped windows. This essay explains how to create a window of unusual shape.
One of the first questions you should ask is "Why?" There are lots of good reasons for needing to create odd-shaped windows, not the least of which is sheer amusement. But before you turn an odd-shaped window loose on an unsuspecting user community, ask yourself why you are doing it. My own opinion is that far too many people do this because they are under one of two illusions: (1) that they are graphic designers or (2) if they are graphic designers, that they understand user interface issues. Alas, my experience has shown that most people who believe either of these are wrong. So try to exercise some judgment in choosing to do this.
That said, there are a lot of good reasons for doing this. One that I encountered some years ago was a need to create "hotspots" on a drawing, where there were correspondences between the shape of the button and, say, the shape of an area on an architectural drawing. I can't get into the details of this one because it was proprietary, but that is a good example of where you would really need an odd-shaped window.
The example I'm going to use here is for sheer amusement. I decided to demonstrate several techniques in this example:
I built this as a dialog-based app.
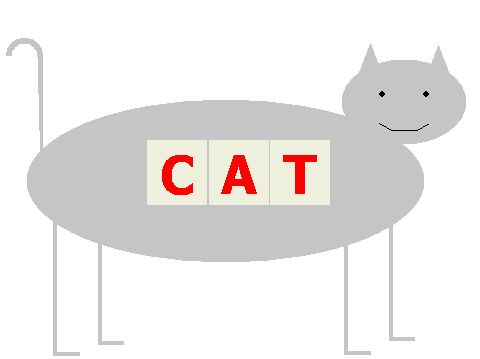
First, let's see what the window looks like: To show this properly with enough contrast, I've set the background of the pictures on this Web page to black.
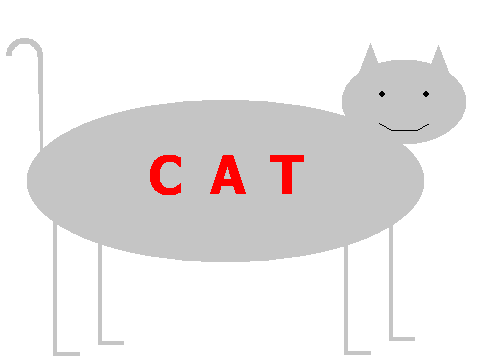 |
The gray parts are the gray cat. Everything else is not part of the window. The window therefore has a very odd shape indeed.
The letters C, A, and T are pushbuttons. If clicked, they will change color, and depending on which button is clicked, the cat's expression will change from happy to neutral to sad.
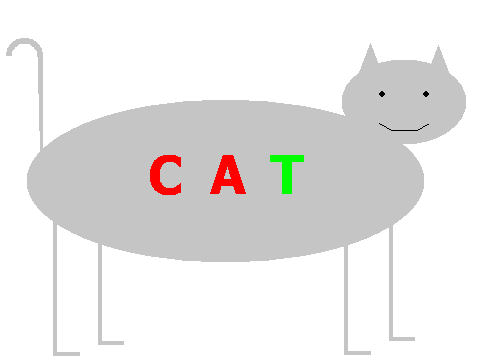
For example, in the screen snapshot below, the caret is over the letter T and the left button has been pushed. This causes the T to display in green.
 |
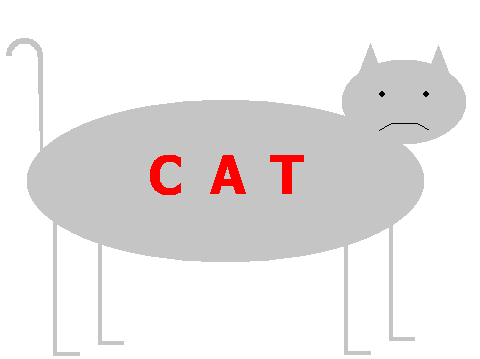
When the button is released, the cat shows her new expression:. This is because the OnTClicked event handler sets the cat's mood to "sad".
 |
Now, to demonstrate this is really the shape of the window, and not just a clever picture, I'll show a rather blank-looking cat reading some of the documentation that tells how to accomplish this. Note that the window which is the cat only obscures the text under the window; the text is otherwise visible.
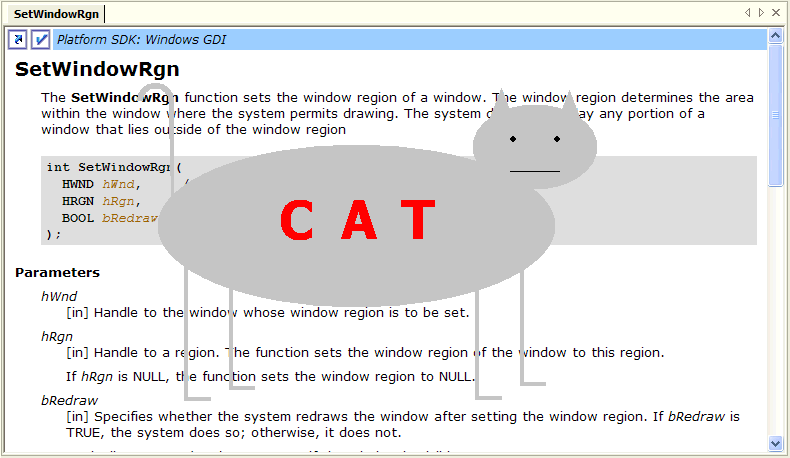
If you download this project and build it, you will discover that clicking on the cat will allow you to drag the cat around the screen, but clicking in any area which is not in the cat, even thought it may be within the bounding box of the cat, will simply activate the app under the cursor, as you would expect.
Now those buttons are rather interesting. They, too, are region-specified windows, and the button is only the letter. Again, if you have the live code, you can demonstrate this by clicking inside the triangular area within the A. You will find that if you position the mouse correctly in this area, you will be able to drag the cat; the button will not activate. Clicking inside the bounding box of the text will not activate the button; only clicking on the letter itself will activate the button.
However, around our house, if we want to fun the Little Gray Cat, we do not pull her leg with some outrageous story1. This form of teasing is known as "pulling the Gray Cat's Tail", and Gray Cats claim they Do Not Approve of this treatment.
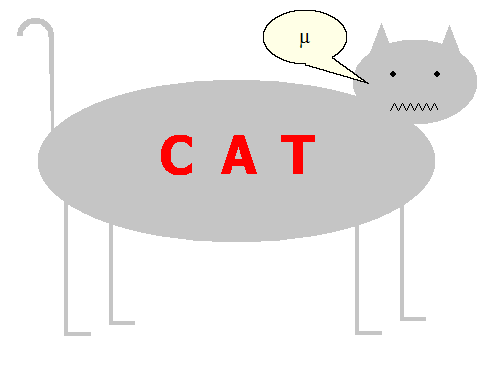
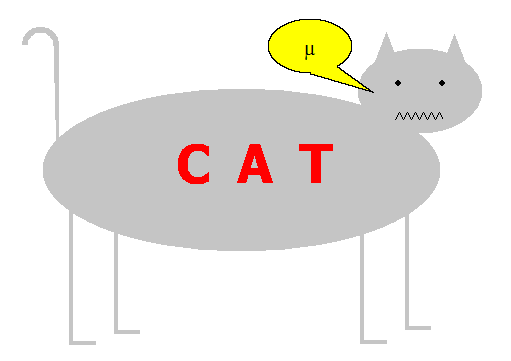
So if you try to drag the cat around by pulling her tail, she expresses dismay at this treatment. The screen snapshot below represents the result of holding the left mouse button down on the Gray Cat's tail and trying to tug her tail.
 |
Now, how did I do all this? There are a lot of features in here that interacted to create this amusing little app.
First, I was very lazy. I did not want to work out how to draw a cat. So instead, I simplified the problem into how to draw Cat Parts. I laid out a set of controls on the dialog, as shown below:
You can see where each Cat Part was drawn: four legs, the body, the tail, the head, and the ears are all obvious. The box which slightly overlaps the head box is used to compute the position of the "Mew" (or "m") balloon. The three buttons are all marked as "owner draw". Each of these static controls is created with the control ID IDC_STATIC, and you must change such IDs to meaningful IDs to make the controls accessible. I used names like IDC_BODY, IDC_HEAD, IDC_TAIL, IDC_RR (Right Read leg) and so on. In addition, I created control member variables (see my essay on Avoiding GetDlgItem) to represent each of these cat components.
I then created a superclass called CCatPart, derived from CStatic, and created classes CEar, CHead, CCatTail, CCatLeg, and CBody which are derived from CCatPart.
Microsoft does not make this easy.
In spite of the fact that all the information is available to handle this, the ClassWizard can only recognize immediate subclasses of the known base classes. So created CCatPart was easy: I just created a new class. All these controls share a common OnEraseBkgnd handler and a common OnPaint handler. The default OnPaint handler guarantees that the CStatic::OnPaint handler is not called, because if it were called, it would try to draw the outline of the frame window I put down, and I don't want this to happen. For those controls where I want more smarts, such as drawing the Little Gray Cat's face, I put an OnPaint handler in that class.
To create the subclasses, I first derived a class like CEar from CStatic, then went in by hand with the text editor and replaced all instances of CStatic in the header file and implementation file with CCatPart. I also removed the asinine inclusion of the main header file, windowregion.h, from every module. There is no sane reason this inclusion is done, and it makes reusability awkward.
For example, in Ear.cpp, I made the changes
indicated symbolically below. I mark in ovestruck red text what I
took out and in blue text what I
added. In addition, I show some declarations that
are optional, and which would normally not be
added. If they are added, there are some
potential problems.
// Ear.cpp : implementation file // #include "stdafx.h"#include "windowregion.h"#include "Ear.h" ... IMPLEMENT_DYNCREATE(CEar, CCatPart) // BEWARE! BEGIN_MESSAGE_MAP(CEar,CStaticCCatPart) //{{AFX_MSG_MAP(CEar) // NOTE - the ClassWizard will add and remove mapping macros here. //}}AFX_MSG_MAP END_MESSAGE_MAP()
The header file Ear.h was also suitably modified. I added the definition file for the CCatPart class, and changed the superclass from CStatic to CCatPart:
// Ear.h : header file // #include "CatPart.h" ///////////////////////////////////////////////////////////////////////////// // CEar window class CEar : publicCStaticCCatPart { ... // Operations public: virtual void DrawPath(CWnd * wnd, CDC & dc); ... protected: DECLARE_DYNCREATE(CEar, CCatPart) // BEWARE!
The virtual method DrawPath is used to actually draw the component. Note that all four legs are the same shape.
I then had to go to the header file where all those CStatic member variables were declared, and change them from CStatic to the correct class, e.g., CHead, CCatTail, CCatLeg, and so on. This is because ClassWizard does not recognize more than one level of derivation ("how quaint!").
class CWindowRegionDlg : public CDialog
{
...
    CStatic CEar c_RightEar;
    CStatic CEar c_LeftEar;
    CStatic CCatTail c_Tail;
    CStatic CCatLeg c_RightRearLeg;
    CStatic CCatLeg c_RightFrontLeg;
    CStatic CCatLeg c_LeftRearLeg;
    CStatic CCatLeg c_LeftFrontLeg;
    CStatic CHead c_Head;
    CStatic CBody c_Body;
If I wanted to use CObject::IsKindOf, I must include the DECLARE_DYNCREATE, DECLARE_DYNAMIC, or DECLARE_SERIAL macros. I actually do not need these, but I'm illustrating them here as an option. However, using these macros has some other implications. The documentation on CObject::IsKindOf says "Do not use this function extensively because it defeats the C++ polymorphism feature. Use virtual functions instead". I use virtual functions.
Paths are interesting graphical entities. They represent a "virtual drawing" on the DC. There is no actual realization of the path, until you actually invoke an operation that draws it, for example, FillPath, which fills in the area, StrokePath, which draws a line that follows the path, and StrokeAndFillPath, which does the obvious. You can also use paths to form regions, which you can later set as clipping regions. If you download the code for Win32 Programming, I have developed a tool called the GDIExplorer which illustrates using paths for clipping. Here's an example of a window that uses the word Cat to clip a background painting of the word mew!:
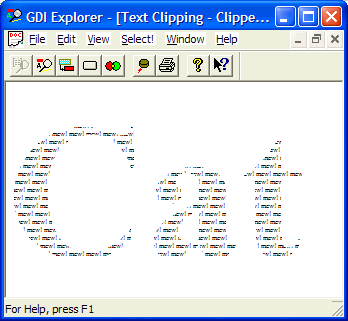
What I'm going to do here is create a path for each CCatPart, then use that path to create a region. I will union all these regions to form the region I want to use to define the window.
I may want to use these regions either locally (for example, I might want to use them to draw outlines of the cat components, which I have not actually done), or I may need the regions to represent the window area I want for the cat component.
In one case, I want a region relative to the parent window; in the second case, I want a region relative to the cat component itself.
To satisfy these needs, and put the drawing of the cat component in the appropriate CCatPart where it belongs, I created the method DrawPath. This is a virtual method of the class CCatPart, but it must be implemented in each of the subclasses.
Here is the declaration in CCatPart
class CCatPart : public CStatic
{
// Construction
public:
CCatPart();

...

// Operations
public:
virtual void DrawPath(CWnd * wnd, CDC & dc) PURE; // Must be overridden in subclasses
...
For those of you more familiar with the C++ syntax, note the following definition exists for MFC:
#define PURE = 0
The simplest path is the path used to draw the body of the cat. This is a simple ellipse. So the CBody::DrawPath method looks like this:
/****************************************************************************
*                              CBody::DrawPath
* Inputs:
*        CWnd * wnd: Window in which path is drawn
*        CDC & dc: DC into which it is drawn
* Result: void
*
* Effect:
*        Draws the path for the head
****************************************************************************/

void CBody::DrawPath(CWnd * wnd, CDC & dc)
   {
    CRect r;                        // [1]
    GetWindowRect(&r);              // [2]
    wnd->ScreenToClient(&r);        // [3]

    dc.BeginPath();                 // [4]

    dc.Ellipse(&r);                 // [5]

    dc.EndPath();                   // [6]
   } // CBody::DrawPath
This function takes a DC, passed by reference, into which the path is created. Exactly what that path is used for is determined by the caller. The CWnd * parameter gives the coordinate transformation basis for the drawing. When I want to create the clipping region for the dialog window, I pass in the CDialog * reference to the main application window (remember, this is a dialog-based app). If I wanted to compute the path in the CStatic-derived class, I would pass in the reference to that window instead.
| Line | Explanation |
| 1 | Declares a rectangle which will hold the window coordinates |
| 2 | Obtains the window rectangle. We want the window rectangle, not the client rectangle, because I've adopted the convention that the window rectangle will determine the size of the drawing, and all computations will be relative to this size. |
| 3 | I then convert the coordinates to be relative to the client area of the appropriate window. Note that since windows may have non-client areas, the coordinates may go negative relative to the client area, but this doesn't matter. When I'm creating the body ellipse to establish the window region, I want the coordinates relative to the client area of the main window, so I will pass in the CDialog * of the main window. |
| 4 | CDC:BeginPath deletes any existing path in the DC, and starts a new path. Only one path at a time can be constructed, although SaveDC/RestoreDC structures can restore a partially-completed path context. |
| 5 | Here is where I will draw the path components. In this case, the path is very simple, an Ellipse. We will later show how to draw more complex paths, all following this same generic structure. |
| 6 | CDC:EndPath terminates the path. What we are left with, upon return, is a new path constructed in the specified DC. |
The call site for this function, in the OnInitDialog handler of the main dialog window, starts out as
CRect r;                                    // [1]
r.SetRectEmpty(); // create an empty region // [2]

CRgn cat;                                   // [3]
cat.CreateRectRgnIndirect(&r);              // [4]

AddRegion(c_Body, cat);                     // [5]
AddRegion(c_Head, cat);
AddRegion(c_Tail, cat);
AddRegion(c_LeftRearLeg, cat);
AddRegion(c_RightRearLeg, cat);
AddRegion(c_LeftFrontLeg, cat);
AddRegion(c_RightFrontLeg, cat);
AddRegion(c_LeftEar, cat);
AddRegion(c_RightEar, cat);

SetWindowRgn((HRGN)cat, TRUE);              // [6]
cat.Detach();                               // [7]
| Line | Explanation |
| 1 | Declares a rectangle which will hold the coordinates of an empty rectangle. |
| 2 | Initializes the rectangle to be the empty rectangl {0, 0, 0, 0} |
| 3 | Declares a CRgn variable. At this point, it has no actual region (HRGN) attached. |
| 4 | Creates an empty rectangular region. I will subsequently add subregions to this region, and ultimately this region defines the overall clipping region for our window. |
| 5 | The AddRegion method is one I wrote that computes a path, converts the path to a region, and adds the region to its input parameter. It is called with each of the CCatPart components. Note that the rectangle defining where the "Mew" balloon goes is not part of the window region, and it does not appear in this enumeration. |
| 6 | I then call SetWindowRgn, which sets the window region. This makes the oddly-shaped window real. Note the use of the (HRGN) cast, which is defined by operator HRGN( ) in the definition of CRgn, and returns the HRGN handle (rather than simply telling the compiler to treat the value as a region handle). |
| 7 |
Normally, when the destructor for the CRgn variable is called, the region will be destroyed. However, it is important to note this paragraph from the description of Cwnd::SetWindowRgn:
This means we must not allow that handle to be closed, or in any way be modified. By calling the Detach method, I have disconnected the relationship of the CRgn to the region handle, and therefore, the handle now becomes "free floating". Had we not passed it into SetWindowRgn, we would at this point have lost the handle and have a genuine resource leak. See my essay on the use of Attach/Detach. |
The AddRegion method is fairly simple. It takes a reference to a CCatPart object and a CRgn object.
/****************************************************************************
*                         CWindowRegionDlg::AddRegion
* Inputs:
*         CCatPart & part: Part of cat to draw
*         CRgn & windowrgn: Region to add to
* Result: void
*
* Effect:
*         Adds the window regiion (as drawn by 'part') to the parent window
*         region 'rgn'
****************************************************************************/

void CWindowRegionDlg::AddRegion(CCatPart & part, CRgn & windowrgn)
  {
   CClientDC dc(this);                               // [1]
   CRgn rgn;                                         // [2]
   part.DrawPath(this, dc);                          // [3]
   rgn.CreateFromPath(&dc);                          // [4]
   windowrgn.CombineRgn(&windowrgn, &rgn, RGN_OR);   // [5]
} // CWindowRegionDlg::AddRegion
| Line | Explanation |
| 1 | Declares a client DC for the current window, that is, the main dialog. |
| 2 | Declares a CRgn object. It currently has no region associated with it. |
| 3 | Invokes the virtual method DrawPath on whichever CCatPart was passed in. This will create a path of some complexity. |
| 4 | Converts the path in the DC to a region. The HRGN that is created is attached to the CRgn variable. |
| 5 | Adds the newly-created region to the existing region. The API ::CombineRgn call takes three regions. The first region is a result region, and in CRgn::CombineRgn the result parameter is the CRgn on which the operation is performed. The remaining two regions are the first two parameters to CRgn::CombineRgn. They are combined by the specification of the third parameter. RGN_OR indicates the two regions are "summed" and the resulting region is the union of the two regions. |
By the time all the calls are done, the resulting window region is the sum of each of the individual CCatPart regions.
The legs are L-shaped regions, so I draw an L-shaped path. Here's the core code from CCatLeg::DrawPath
dc.BeginPath();
dc.MoveTo(r.left, r.top);                                // A
dc.LineTo(r.left, r.bottom);                             // A-B
dc.LineTo(r.right, r.bottom);                            // B-C
dc.LineTo(r.right, r.bottom - LEG_WIDTH);                // C-D
dc.LineTo(r.left + LEG_WIDTH, r.bottom - LEG_WIDTH);     // D-E
dc.LineTo(r.left + LEG_WIDTH, r.top);                    // E-F
dc.CloseFigure();                                        // F-A

dc.EndPath();
Here's the path I'm about to draw (in the interest of making it easy to see, the proportions have been distorted). Note that I surround this, as I have in all the DrawPath methods, with a BeginPath and EndPath. The result of this drawing is not a drawing of a leg, but a path which would define the drawing of the leg if it were done.
 What
I've done here is draw most of the path. I have not drawn all of the path, and
that's important.
The comments in the code above indicate which segment of the leg is being draw.
Now the question is, why didn't I explicitly draw the path segment F-A, which should complete the outline of the leg?
The key to this is the specification found in the documentation of CRgn::CreateFromPath.
The device context identified by the pDC parameter must contain a closed path.
This has a very specific requirement: the path must be closed. Although it is not obvious unless you know where to look the following statement appears in the description of CloseFigure:
A figure in a path is open unless it is explicitly closed by using this function. (A figure can be open even if the current point and the starting point of the figure are the same.)
That is, if I explicitly did a LineTo from point F to point A, I'd have an open path, even though visually it would not be distrnguishable from the path I get by explicitly closing the figure, using the method CloseFigure. However, an open path would not work for CRgn::CreateFromPath, and the reason for the failure would probably not be obvious if you weren't familiar with paths. So the result is that I get an implicit LineTo from wherever the path leaves off to wherever the path started (and it started with the first operation following BeginPath). Note also that paths are order-dependent. That is, if I were just drawing the lines for the leg, I could choose to to MoveTo/LineTo combinations that simply laid down the lines in any order. But a path really does depend on the order, which we'll see for the most complex drawing, the tail of the cat.
 The
tail is actually no more complex than the leg, except that I use curved segments
instead of straight segments. However, having understood how the leg is drawn,
it will now be easy to see how the tail is drawn.
The key API here is CDC::AngleArc, which draws an arc from a starting rotation position (where 0 represents "East", and angles are expressed in degrees of rotation, positive for counterclockwise and negative for clockwise). AngleArc specifies a starting angle, and a relative displacement from that, the sweep angle. Note that the sweep angle is always a displacement in degrees, not a specification of the actual ending point angle.
Thus the B-C line is drawn starting at rotation point 0 ("due East") and sweeping for 180 degrees (positive means counterclockwise). The D-E line is drawn starting at rotation point 180 ("due West") and sweeping for -180 degrees (negative means clockwise). The two other coordinate values represent the center of rotation, which for a semicircle tht touches the top is a half-width down and a half-width from the left, and the radius is half-a-width. The D-E line is similar except for the rotational direction and the radius.
The code from CCatTail::DrawPath is shown below.
 dc.BeginPath();

dc.MoveTo(r.right, r.bottom);                    // A
dc.LineTo(r.right, r.top + r.Width()/2);         // A-B
dc.AngleArc(r.left + r.Width() / 2,              // B-C
            r.top + r.Width() / 2,
            r.Width() / 2,
            0, 180);

dc.LineTo(r.left + TAIL_WIDTH, r.top + r.Width() / 2);  // C-D


dc.AngleArc(r.left + r.Width() / 2,             // D-E
            r.top + r.Width() / 2,
            r.Width() / 2 - 2 * TAIL_WIDTH,
            180, -180);

dc.LineTo(r.right - TAIL_WIDTH, r.bottom);      // E-F

dc.CloseFigure();                               // F-A

dc.EndPath();
|
At this point, my AddRegion function has called upon each CCatPart to draw its region, and has incorporated those regions into a single large region, which it then uses to set the window region.
If, however, I added DECLARE_DYNAMIC, DECLARE_DYNCREATE, or DECLARE_SERIAL on these classes, I would not be able to use a PURE virtual method in the "base" class of my subhierarchy. I would have to write
virtual void DrawPath(CWnd * wnd, CDC & dc) { ASSERT(FALSE); } // Must be overridden in subclasses
I would have to do this if I needed the facilities supported by these macros, such as CObject::IsKindOf.
Now, you may ask, "Isn't it obvious that you should declare that as a pure virtual method, and then implement it in the subclass in the usual C++ fashion?" Yes, that is an obvious question, and an obvious solution.
Unfortunately, it doesn't work for MFC window classes.
This is because MFC will not compile if any virtual method of a CObject-derived class has a PURE method. For example, if I need to use IsKindOf, and added DECLARE_DYNCREATE or IMPLEMENT_DYNCREATE, I would get the following error message when I tried to compile a subclass, such as CEar:
--------------------Configuration: WindowRegion - Win32 Debug-------------------- Compiling... Ear.cpp J:\mvp_tips\WindowRegion\Ear.cpp(13) : error C2039: 'classCCatPart' : is not a member of 'CCatPart' j:\mvp_tips\windowregion\catpart.h(13) : see declaration of 'CCatPart' J:\mvp_tips\WindowRegion\Ear.cpp(13) : error C2065: 'classCCatPart' : undeclared identifier Error executing cl.exe. WindowRegion.exe - 2 error(s), 0 warning(s) |
That indicates that I forgot to declare the appropriate declaration in the superclass. So if I were to add DECLARE_DYNCREATE and IMPLEMENT_DYNCREATE in the superclass CCatPart, I would then get the following error.
--------------------Configuration: WindowRegion - Win32 Debug-------------------- Compiling... CatPart.cpp J:\mvp_tips\WindowRegion\CatPart.cpp(15) : error C2259: 'CCatPart' : cannot instantiate abstract class due to following members: j:\mvp_tips\windowregion\catpart.h(13) : see declaration of 'CCatPart' J:\mvp_tips\WindowRegion\CatPart.cpp(15) : warning C4259: 'void __thiscall CCatPart::DrawPath(class CWnd *,class CDC &)' : pure virtual function was not defined j:\mvp_tips\windowregion\catpart.h(24) : see declaration of 'DrawPath' J:\mvp_tips\WindowRegion\CatPart.cpp(15) : error C2259: 'CCatPart' : cannot instantiate abstract class due to following members: j:\mvp_tips\windowregion\catpart.h(13) : see declaration of 'CCatPart' J:\mvp_tips\WindowRegion\CatPart.cpp(15) : warning C4259: 'void __thiscall CCatPart::DrawPath(class CWnd *,class CDC &)' : pure virtual function was not defined j:\mvp_tips\windowregion\catpart.h(24) : see declaration of 'DrawPath' Error executing cl.exe. WindowRegion.exe - 2 error(s), 2 warning(s) |
Therefore, if you want virtual methods and CObject::IsKindOf, you cannot have any pure virtual methods anywhere in the hierarchy. I avoid this in the Gray Cat application by not adding the DECLARE_/IMPLEMENT_ macros, so I can successfully use a PURE virtual method.
Drawing the buttons is a bit trickier. This is because we want to define the button by the region defined by its text, which in the case of these buttons is a single letter. But note that if that string had more letters, the button region would be the region defined by all the text, and only the characters would be an active part of the window.
Computing the window region isn't any different than what we did for the main window. We compute a path which is the outline of the window, then use CRgn::CreateFromPath to convert that path to a region. However, to get the correct region for a letter requires that we must use SetBkMode(TRANSPARENT), otherwise the path would include the bounding box for the character string being converted. This is not the desired effect.
First, I wrote the code to call SetWindowRgn. Since I needed the path for two different purposes, I wrote a separate function to create the path on which the clipping is based. I set the shape in PreSubclassWindow:
void CTextButton::PreSubclassWindow()
  {
   CClientDC dc(this);
   int save = dc.SaveDC();

   CreateButtonPath(dc);

   CRgn region;
   VERIFY(region.CreateFromPath(&dc));
   VERIFY(SetWindowRgn((HRGN)region, TRUE));
   region.Detach(); // must not close handle
   dc.RestoreDC(save);
   CButton::PreSubclassWindow();
  }
The first time I ran this code, the SetWindowRgn failed. It took a bit of time to remember why this was so, which I'll cover shortly.
To create the path, I wrote the function CreateButtonPath, which creates the path which outlines the character.
void CTextButton::CreateButtonPath(CDC & dc)
  {
   CString s;
   GetWindowText(s); // get character that forms button     // [1]

   CRect r;
   GetClientRect(&r);                                       // [2]
   CFont * f;
   f = GetFont();                                           // [3]

   LOGFONT lf;                                              // [4]
   f->GetLogFont(&lf);                                      // [5]

   CFont tfont;                                             // [6]
   lf.lfHeight = r.Height();                                // [7]
   lf.lfWeight = FW_EXTRABOLD;                              // [8]
   tfont.CreateFontIndirect(&lf);                           // [9]

   dc.SetBkMode(TRANSPARENT);                               // [10]
   CFont * old = dc.SelectObject(&tfont);                   // [11]
   dc.SetTextAlign(TA_CENTER);                              // [12]

   dc.BeginPath();                                          // [13]
   dc.TextOut(r.Width() / 2, 0, s);                         // [14]
   dc.EndPath();                                            // [15]

   dc.SelectObject(old);                                    // [16]
  } // CTextButton::CreateButtonPath
| Line | Explanation |
| 1 | Obtains the current caption for the button |
| 2 | Gets the actual client rectangle |
| 3 | Obtains the font from the current button. In this case, I chose to use the existing font and simply create a tall version of it. This has a serious implication. We will only be able to use TrueType fonts. If I wanted a different font, I would not have bothed to do the GetFont, but simply initialized the LOGFONT structure to the font I desired. |
| 4 | A LOGFONT structure holds the font description. |
| 5 | I obtain the font information of the current font to initialize the LOGFONT structure, because I want to use the current font, whatever it is, only larger. |
| 6 | I declare a local font variable. I will not need this font beyond this function, so I don't need to create it in the button class so it remains. |
| 7 | I set the font height to be the height of the client area. This assumes that I know that the text will fit into the button in this font. But I've already determined that the text is a single character. If I wanted multi-character text, my choice of font height might be more complex. |
| 8 | I added this after I saw the initial results; I want characters "thick enough" to click. FW_EXTRABOLD gave me a satisfactory size. |
| 9 | I create the new font. |
| 10 | SetBkMode(TRANSPARENT) is required so the path outlines the character itself, not the bounding box. |
| 11 | I select the font into the DC. Note that I save the old font. Normally, I do not bother with this (see my essay on using SaveDC/RestoreDC), but in this case the save/restore won't work because the restore, in addition to deselecting the font, would deselect the newly-drawn path. So I have to save the old font so it can be reset before I leave scope. |
| 12 | I want the text to be horizontally centered. So I select TA_CENTER mode, which says that the text will be centered around the x-coordinate that I select for the TextOut. |
| 13 | I indicate that I'm starting a path. |
| 14 | I write out the character. Because I set TA_CENTER mode, the text will be centered on the x-coordinate. So I set the x-coordinate to be the center of the control, r.Width() / 2. |
| 15 | I indicate that I'm done with the path. |
| 16 | I set the old font back to the DC. This is important. If I failed to do this, when the destructor for tfont will call DeleteObject on its HFONT. But because the font would be selected into the DC, it won't actually be deleted, so there will be a resource leak. By doing this SelectObject, I ensure that the font is not actively selected. |
This function creates the path of the letter (or in general, any text). When called from PreSubclassWindow, this path will be used to create the window region.
Because paths only work for TrueType fonts, and the default font used by VS6 projects, MS Sans Serif, is not a TrueType font. The result was that the SetWindowRgn call failed because the region was empty. What I did was go into the dialog properties and change the default font for the dialog to Tahoma, which is a TrueType font. So you have to make sure that when you are creating text paths, you are using TrueType fonts.
I did a copy-and-paste from another program I once wrote, and used it to explore what the path segments were. In fact, I got a path of 0 segments, which was the dead giveaway that there was a failure in the path construction. Then I remembered the TrueType issue.
int size = dc.GetPath(NULL, NULL, 0);
LPPOINT points = new POINT[size];
LPBYTE types = new BYTE[size];
dc.GetPath(points, types, size);
CString line;
for(int i = 0; i < size; i++)
  { /* scan points */
   CString t;
   t.Format(_T("[%4d, %4d] "), points[i].x, points[i].y);
   line += t;
   switch(types[i] & ~PT_CLOSEFIGURE)
     { /* types */
      case PT_MOVETO:
         line += _T("PT_MOVETO");
         break;
      case PT_LINETO:
         line += _T("PT_LINETO");
         break;
      case PT_BEZIERTO:
         line += _T("PT_BEZIERTO");
         break;
     } /* types */
   if(types[i] & PT_CLOSEFIGURE)
      line += _T(":PT_CLOSEFIGURE");

   line += _T("\r\n");
  } /* scan points */
delete points;
delete types;
This code uses GetPath to obtain the number of points in the path, then allocates two arrays to be filled in, and calls GetPath again to get the actual path data. Then it simply loops through the points, displaying each appropriately. In this case, I add the data to a string. Note that the PT_CLOSEFIGURE bit is ORed into the types value, and must be masked out before doing the comparisons.
Since I am using an owner-draw button, I have to provide a DrawItem handler. Here is a very simple (and incorrect) one, based on an ordinary button handler that I might use for any other semi-fancy button I do.
void CTextButton::DrawItem(LPDRAWITEMSTRUCT dis)
  {
   CDC * dc = CDC::FromHandle(dis->hDC);       // [1]
   CRect r;
   GetClientRect(&r);                          // [2]

   int save = dc->SaveDC();                    // [3]

   COLORREF color;                             // [4]
   color = dis->itemState & ODS_SELECTED ? RGB(0,255,0) : RGB(255, 0, 0);  // [5]

   CBrush br(color);                           // [6]
   dc->SelectObject(&br);                      // [7]

   // CreateButtonPath(*dc);                   // [8]

   //dc->SelectClipPath(RGN_COPY);             // [9]

   dc->PatBlt(0, 0, r.Width(), r.Height(), PATCOPY); // [10]

   // dc->StrokePath();                        // [11]

   dc->RestoreDC(save);                        // [12]
  }
| Line | Explanation |
| 1 | Creates an MFC CDC * object from the HDC passed in via the LPDRAWITEMSTRUCT. Note that I rename the parameter to something sane, like dis, not the horrific name that the ClassWizard puts in there. I refuse to type a name that long. |
| 2 | I obtain the client rectangle for the control. |
| 3 | I save the current DC state. See my essay on SaveDC/RestoreDC. |
| 4 | I am going to draw the unpressed button as red and the depressed button as green. |
| 5 | Based on the ids->itemState field, I determine if the button is pressed by examining the ODS_SELECTED bit, and selecting one of two colors. |
| 6 | I create a solid brush of the selected color. |
| 7 | I select this brush into the DC, so the PatBlt will fill the area with the selected brush. |
| 8 | In the initial version, I did not have this line. However, I need to get the path used to determine the button region. |
| 9 | In order to restrict the filling to the window region, I hadd to add this line to create a clipping region based on the path. As explained below, this is necessary to keep the drawing "within the lines". |
| 10 | This fills the area defined by the window rectangle. For a square window, this merely fills the client area. But for a window defined by SetWindowRgn, this will fill a rectangular area based on the CS_PARENTDC clipping area (see below), unless the lines of code to obtain the path and clip to the same region as the window (lines 8 and 9) are uncommented. |
| 11 | This outlines the button. |
| 12 | I restore the DC. This means that when the destructor for the CBrush is called, the brush is no longer selected into the DC, and the destructor's DeleteObject call will successfully delete the brush. |
Controls such as pushbuttons are created from a class that has the CS_PARENTDC style. This means when the control is drawn, its clipping rectangle is set to the clipping rectangle of the parent class. According to the documentation, "Specifying CS_PARENTDC enhances an application's performance" although it is questionable if this has any meaning on a modern 4GHz machine (which is a lot more than 1000 times faster than a 4.77MHz 8088). However, once the principle is established, the functionality has to remain the same.
However, what this means is that if you draw on the DC, effectively you have no clipping. For example, even though I've set the window region in PreSubclassWindow, my FillSolidRect call in DrawItem (which I've simplistically set to fill the entire region) will produce the following result.
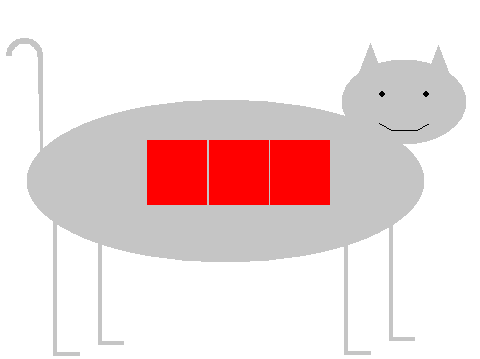 |
This is not ideal. Because the DC is the CS_PARENTDC, the clipping was limited only by the parent window clipping area, so in spite of the fact that I had called SetWindowRgn, the window was ignored.
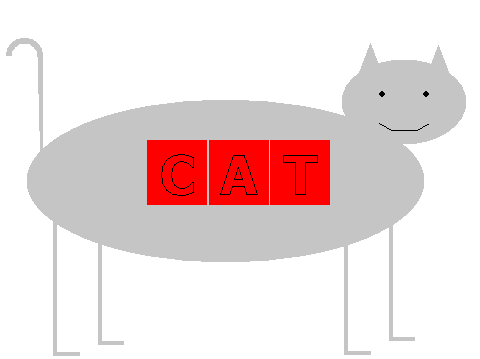
So I called the CreateButtonPath (the line shown as line 8) and did a StrokePath. This draws the outline of each character as shown below, but it doesn't solve the problem that the fill "painted outside the lines".
 |
So I added the line to call SelectClipPath (line 9) and now the filling was limited to the actual window area. Almost there!
The problem was that I now saw the result shown below. The background erasure gives the following effect because the FillSolidRect or PatBlt (I'm not sure which, since it is undocumented) that draws the background is not constrained by the actual clipping region of the window.
 |
So I added an OnEraseBkgnd handler. In this case, there was no need to erase the background at all. Had I wanted to limit the background erasure, I could have called CreateButtonPath and SelectClipPath before calling the superclass method, that is, I could have done
BOOL CTextButton::OnEraseBkgnd(CDC* pDC)
  {
   CreateButtonPath(*dc);                    // [8]

   dc->SelectClipPath(RGN_COPY);             // [9]
   return CButton::OnEraseBkgnd(pDC); // Do not call superclass
  }
This would have the effect of limiting the erasure area. However, because for this example, there is no background distinct from the button color, I simply overrode the function and returned immediately. This reduces flicker.
BOOL CTextButton::OnEraseBkgnd(CDC* pDC)
  {
   return TRUE;
  }
I now got the correct representation of the three buttons on the cat, as shown in the first snapshot.
The button handlers for the buttons C, A and T are quite simple. They simply call a method called SetMood which sets the mood of the cat to Happy, Neutral, or Sad.
void CWindowRegionDlg::OnC()
  {
   c_Head.SetMood(CHead::HAPPY);
  }
The SetMood method represents a common idiom for updating the state of a window. In this case, because the drawing is so simple, I simply Invalidate the entire window and let it all redraw. If performance had been an issue, I would have invalidated only the constrained rectangle that needed to be redrawn. Note that it would be inappropriate to have the caller call Invalidate to force the redraw, because it is essentially none of its business that an Invalidate is required at all, and certainly the area to be invalidated cannot be known by the caller. I find this to be another common error that is frequently made; after calling a function to update the information regarding a window, the caller (that is, the OnC handler) would call c_Head.Invalidate( ). This would be very poor technique.
void CHead::SetMood(mood t)
{
 if(t == themood)
   return;
 themood = t;
 Invalidate(TRUE);
} // CHead::SetMood
It is worth pointing out that of all the rectangles shown, only the head and the tail are marked as "Visible", because they are the only two that are actually used for anything other than determining the clipping region of the window. The head has a face drawn on it, and the tail is active and must receive mouse clicks. To avoid having to write an OnPaint handler for all the other cat parts, I just marked them as invisible by deselecting the Visible attribute.
One of the most common errors beginners make is to "wire down" coordinate values. This is almost always a serious error. The coordinates should always be computed as a function of the current size of the window. A value like 50,50 is a meaningless coordinate, since it would only work on one display resolution, with one default font setting, on one display driver. Possibly only on one display. Writing coordinates like this into a system is therefore erroneous.
I wanted to create a good-looking "cat face" (based on my drawings of The Little Gray Cat) no matter what display was running, no matter what the default user font, and no matter what the display resolution. This means that I work in terms of relative sizes.
Here's the logic to draw the cat face:
void CHead::OnPaint()
  {
   CPaintDC dc(this); // device context for painting

   int save = dc.SaveDC();
   int SMILE_HEIGHT = 7 * ::GetSystemMetrics(SM_CYBORDER);

   CRect r;
   GetClientRect(&r);

   dc.FillSolidRect(&r, (COLORREF)GetParent()->SendMessage(UWM_QUERY_COLOR));

   int SMILE_WIDTH = (int)(0.4 * (double)r.Width());
   CRect smile;
   smile.left = r.Width() / 2 - SMILE_WIDTH / 2;
   smile.top = (int) ( (0.75) * (double)r.Height());
   smile.right = r.Width() / 2 + SMILE_WIDTH / 2;
   smile.bottom = smile.top + SMILE_HEIGHT;

   switch(themood)
      { /* mood */
       case HAPPY:
           dc.MoveTo(smile.left, smile.top);
           dc.LineTo(smile.left + SMILE_WIDTH / 4, smile.bottom);
           dc.LineTo(smile.right - SMILE_WIDTH / 4, smile.bottom);
           dc.LineTo(smile.right, smile.top);
           break;
       case NEUTRAL:
           dc.MoveTo(smile.left, smile.top + smile.Height() / 2);
           dc.LineTo(smile.right, smile.top + smile.Height() / 2);
           break;
       case SAD:
          dc.MoveTo(smile.left, smile.bottom);
          dc.LineTo(smile.left + SMILE_WIDTH / 4, smile.top);
          dc.LineTo(smile.right - SMILE_WIDTH / 4, smile.top);
          dc.LineTo(smile.right, smile.bottom);
          break;
       case STARTLED:
          { /* startled */
           // /\/\/\/\ <= Cat's startled expression (n = 4)
           // | |
           // left right
           #define MAX_WIGGLES 6
           dc.MoveTo(smile.left, smile.bottom);
           UINT wiggle = smile.Width() / MAX_WIGGLES;
           for(int i = 0; i < MAX_WIGGLES; i++)
             { /* draw one wiggle */
              dc.LineTo(smile.left + i * wiggle + wiggle/2, smile.top);
              dc.LineTo(smile.left + (i + 1) * wiggle, smile.bottom);
             } /* draw one wiggle */
          } /* startled */
     } /* mood */

   int EYE_SIZE = 6 * ::GetSystemMetrics(SM_CYBORDER);
   CBrush br;
   br.CreateStockObject(BLACK_BRUSH);
   dc.SelectObject(&br);
   CRect RightEye(smile.left, (int) ( (0.38)*(double)r.Height()),
   smile.left + EYE_SIZE, 0);
   RightEye.bottom = RightEye.top + EYE_SIZE;

   CRect LeftEye(smile.right - EYE_SIZE, RightEye.top,
   smile.right, RightEye.bottom);

   dc.Ellipse(&RightEye);
   dc.Ellipse(&LeftEye);

   dc.RestoreDC(save);
   // Do not call CCatPart::OnPaint() for painting messages
  }
Note that there are no absolute values in here. I do use multipliers of system constants, but these "constants" can change based on the resolution of the device. By choosing to work in terms of multiples of these basic quanta, I achieve a certain confidence that they will remain display-resolution-independent. Other values are ratios of the window size. These are also resolution-independent.
I wanted to be able to click on the cat and drag her around. The trick here is to override the OnNcHitTest method, so that any click appears to be in the caption bar. When this is noted, the caption-bar-click-and-drag semantics are automatically invoked, and I can drag the cat around.
UINT CWindowRegionDlg::OnNcHitTest(CPoint point)
  {
   return HTCAPTION;

   //return CDialog::OnNcHitTest(point);
  }
In this case, it was a very simple modification. I simply always return HTCAPTION as the only possible value. If I wanted to have resizing, I'd have to detect when the mouse was over the new window border and return the appropriate HT... value. But I didn't need that feature for this project, so I simply always return HTCLIENT. This will have an implication in terms of detecting right-button-down events.
Note that I did not attempt to replicate the caption bar, system menu, minimize, maximize/restore, or close buttons found in normal windows. Furthermore, I did an override of OnCancel so the Escape key would not close the app (see my essay on Dialog-based apps). So there's no way to shut the app down, or see the About box.
So the obvious solution was to add a right-mouse-button handler and pop up a menu. First, I had to create the menu. I did this in the resource editor.
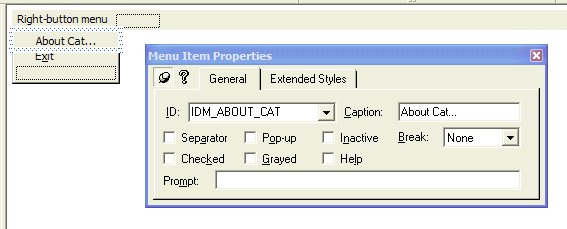 I just create a fairly
ordinary-looking menu item. Then I added on OnRButtonDown handler to pop
the menu up.
void CWindowRegionDlg::OnRButtonDown(UINT nFlags, CPoint point)
  {
   CMenu menu;
   menu.LoadMenu(IDR_MENU);
   menu.GetSubMenu(0)->TrackPopupMenu(0, point.x, point.y, this);
   CDialog::OnRButtonDown(nFlags, point);
  }
Note that this is about as simple a handler as you can imagine. The idiom of calling LoadMenu and using GetSubMenu(0) to get the one-and-only popup menu is a common one. The TrackPopupMenu handler, by specifying the parameter this, causes the notifications to go to the current window. Therefore, ordinary command handlers can be added to process the commands.
I was at first surprised when I tried a right-click and no menu came up. So I put a breakpoint on the OnRButtonDown handler and didn't get the breakpoint either. So I went back to using Spy++ to see what messages I was getting.
You can always tell an engineer by their sloped forehead.
The sloped forehead is caused by the oft-repeated gesture of slapping one's forehead and saying "Duh! OF COURSE! I Knew That!" And this is an example. When I looked at the Spy++ output, I saw the following. Well, something like the following. In the interest of fitting this into a nice little image on a Web page, I went in to Spy++ and turned off many of the "stock" messages so I was left with the ones I wanted to show. If you just start up Spy++, you'll see a lot more fluff, from which you are going to have to discover this sequence. Fortunately, there isn't all that much fluff intermingled in these messages.
 Note that the
WM_NCHITTEST message was sent first. As already
described, I wanted all of the cat window to be treated as a caption bar so
that mouse click-and-drag would drag the cat image around. So I returned
HTCAPTION in my handler. But here was the problem: it meant that the
subequent mouse click was interpreted not as a click on the client area,
but as a click in the non-client area! So when the mouse button was clicked
down, the WM_NCRBUTTONDOWN message was sent, indicating a click in
the non-client area. Of course, I didn't have a handler for this!
What I did was add an OnNcRButtonDown handler, using ClassWizard. This solved the problem.
void CWindowRegionDlg::OnNcRButtonDown(UINT nHitTest, CPoint point)
  {
   CMenu menu;
   menu.LoadMenu(IDR_MENU);
   menu.GetSubMenu(0)->TrackPopupMenu(0, point.x, point.y, this);
  }
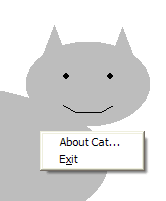
The result was that I could now get the popup menu and select one of the two menu items.
 |
The problem with a CButton is that it only sends a BN_CLICKED notification to its parent when the button is released. I wanted to be able to receive a notification when the mouse went down in a special area, and another when it went up. I had a couple choices here. One was to write a more complex WM_NCHITTEST, which would return HTCLIENT for the tail area of the cat; another was to create a special control, something like a button, that would react to the mouse click. For simplicity, I chose the latter solution.
I marked the tail area as a "Visible" button, and furthermore added the "Notify" (SS_NOTIFY) style. Then I could add mouse button handlers to the static control (remember that this static control is CCatTail, derived from CCatPart, derived from CStatic).
The simplest notification was simply to notify the parent that the mouse button had been clicked. To do this, I simply invented a new notification code, the CatTail notification (CT_), so I chose two arbitrary values:
#define CT_LBUTTONDOWN    100
#define CT_LBUTTONUP      200
I then added two simple handlers. Note that I later had to enhance these handlers for dragging, but for now we will just look at the simple version of the handlers.
void CCatTail::OnLButtonDown(UINT nFlags, CPoint point)
  {
   GetParent()->SendMessage(WM_COMMAND, (WPARAM)MAKELONG(GetDlgCtrlID(), CT_LBUTTONDOWN), (LPARAM)m_hWnd);

   CStatic::OnLButtonDown(nFlags, point);
  }

void CCatTail::OnLButtonUp(UINT nFlags, CPoint point)
  {
   GetParent()->SendMessage(WM_COMMAND, (WPARAM)MAKELONG(GetDlgCtrlID(), CT_LBUTTONUP), (LPARAM)m_hWnd);
   CStatic::OnLButtonUp(nFlags, point);
  }
Note that I send a WM_COMMAND message, which conforms to the requirements of all WM_COMMAND messages, to the parent. The specification is that the LPARAM is the window handle of the control, the LOWORD of the WPARAM is the control ID of the control, and the HIWORD of the WPARAM is the notification code, which is one of our two newly-created notification codes.
In the parent, I have to manually add the entries to the MESSAGE_MAP, because there is no built-in support in ClassWizard for controls of type CCatPart or CCatTail. The ON_CONTROL macro is useful for this purpose. It takes three parameters: the notification code, the control ID, and the name of the function to be called.
ON_CONTROL(CT_LBUTTONDOWN, IDC_TAIL, OnTailDown)
ON_CONTROL(CT_LBUTTONUP,   IDC_TAIL, OnTailUp)
Note that unlike an ordinary user-defined message handler, the prototype for the methods is
void classname::method()
You can do this with any window, so it should now be obvious how to create routable WM_COMMAND messages to a parent.
The most common popup window we use is the dialog, either a modeless dialog or a modal dialog. A dialog is a sort-of-child window, but unlike a WS_CHILD style window, it is not clipped by the boundaries of the parent window. But we can create any kind of WS_POPUP window we want. I needed a balloon to indicate the cat was speaking. Saying, in fact, "m" (it is a tradition in the Gray Cat cartoons that neither the Gray Cat nor the flounder speak or think in words. Various iconographic representations of speech are used). This window would not be part of the window region, but I wanted it to pop up when the cat's tail was pulled.
First, I used ClassWizard to create a subclass called CBalloon, a subclass of a generic CWnd. I then added several methods to it
I also added some other methods "by hand".
It is important to realize that in some cases "It's just code". There is nothing sacred about what the ClassWizard adds, particularly if it is unsuitable. The ClassWizard is a tool, not a fully-general-purpose engine designed to cover every possible contingency. It does not support user-defined message handlers, ON_CONTROL messages, and many other useful features. And its generic Create handler is just that: generic. It is not suitable for all purposes. So I rewrote its parameter list a bit. Since I do not use DYNCREATE, I do not need compatibility with any existing interface.
Note, however, that if you hand-edit ClassWizard-generated code, you take on certain risks. Therefore, this comes with the usual warning
|
Professional driver on closed course. Do not attempt this at home. |
I changed its parameter list to be
virtual BOOL Create(LPCTSTR lpszWindowName, LPCTSTR font, DWORD dwStyle, const RECT& rect, CWnd* pParentWnd, CCreateContext* pContext = NULL);
The implementation is
BOOL CBalloon::Create(LPCTSTR lpszWindowName, LPCTSTR fontname, DWORD dwStyle, const RECT& rect, CWnd* pParentWnd, CCreateContext* pContext)
  {
   LPCTSTR BalloonClassName = AfxRegisterWndClass(0, 0, (HBRUSH)(COLOR_INFOBK + 1), 0);             // [1]

   ASSERT((dwStyle & WS_CHILD) == 0); // must not be child style                                    // [2]
   dwStyle |= WS_POPUP; // must be popup                                                            // [3]

   if(!CWnd::CreateEx(0, BalloonClassName, lpszWindowName, dwStyle, rect, pParentWnd, 0, pContext)) // [4]
      return FALSE;                                                                                 // [5]

   CFont * f = pParentWnd->GetFont();                                                               // [6]
   LOGFONT lf;
   f->GetLogFont(&lf);
   lf.lfHeight *= 2;
   lstrcpy(lf.lfFaceName, fontname);
   font.CreateFontIndirect(&lf);

   return TRUE;                                                                                     // [7]
  }
| Line | Explanation |
| 1 | I need a registered class to call the CWnd::CreateEx method. So I call AfxRegisterWndClass, which takes several parameters. I do not need any special class styles, so the first parameter is 0. I do not need a special cursor; the default IDC_ARROW is sufficient, so the second parameter is 0. The background brush establishes the color. I want to use the background used for the other popup help windows, so I want to use the color COLOR_INFOBK. For completely bizarre reasons that defy logic (the trivial solution would have been to eliminate the color whose code was 0, and reassign that, but such a leap of design seems to have escaped Microsoft), to use a built-in color, you have to supply the color code, plus one, and then cast that to an HBRUSH. And this window will not have an icon, so the last parameter is 0. I get back a string, whose value I do not care about except to pass back to CWnd::CreateEx, so I just store it in a local variable. Unlike the ::RegisterClass API call, AfxRegisterWndClass creates a synthetic name based on the input parameters and styles, and if the class is already registered, it is not considered an error. Therefore, this call can be done as often as needed without worrying about saving the value or dealing with the possibility of redundant definitions. |
| 2 | I do allow other styles to be passed in, but it would be an error to pass in a WS_CHILD style. Therefore, I will ASSERT if this style appears. |
| 3 | It is also an error to fail to pass in the WS_POPUP style, but since any window of this class must be a popup, I merely force the style bit to be set. |
| 4 | I then create the window. To do this, I have to call CreateEx, not Create. The Create method is only used for child controls, and contains a similar ASSERT to the one I used on line 2, except it will ASSERT if the WS_CHILD style is not present. This, of course, makes it completely unusable for creating a popup window. The window name is the text to be displayed in the balloon, the style parameters, except for the WS_POPUP style bit which is always forced, are simply passed through from the caller, as is the rectangle. Since this is a popup window, I do not need a control ID, so I use 0. |
| 5 | If this fails, I immediately return FALSE |
| 6 | The remaining lines merely create a font, twice as high as the default font. I could have made the input be a LOGFONT, instead of an LPCTSTR of the facename, but for this example, the facename alone was sufficient. |
| 7 | Finally, I return TRUE |
Like many other windows here, this window will have a custom window region. I needed an algorithm to compute the region. I chose the following one:
 I
computed the window region based on the geometry of an enclosing rectangle. I
made the "balloon" part of the window be a fixed percentage of the window width
and height. This gave me a rectangle, whose origin is 0,0 relative to the client
coordinates, and whose width is w and whose height is h.
So I create an elliptical region of this size. I then OR this region into the
master region.
Then, to get the pointer, I compute the center point of the rectangle, A, and draw a line from this point (which would be (w/2, h/2) to the lower right corner of the enclosing rectangle. I then draw a line from that point to the center of the bottom of the ellipse, (w/2, h), B. As with other paths, I then call CloseFigure to close the region, effectively drawing the line C-A. I then OR this region with the previous region, and call SetWindowRgn to create the region for the popup window.
I perform these compuations in the OnCreate handler.
To create a fully-general solution, I'd probably have style parameters that determined the ratio values, the direction of the pointing part of the window, etc., but this simple example illustrates one approach to doing this, and the generalizations are left as an Exercise For The Reader.
int CBalloon::OnCreate(LPCREATESTRUCT lpCreateStruct)
  {
   if (CWnd::OnCreate(lpCreateStruct) == -1)
      return -1;

   CRgn rgn;
   GetBalloonRgn(rgn);

   SetWindowRgn((HRGN)rgn, TRUE);
   rgn.Detach();

   return 0;
  }
As with the previous examples of creating a window region, it is important to Detach the region handle so it is not destroyed when the CRgn variable leaves scope. The function GetBalloonRgn is defined as shown below. It should now be easy, given the earlier detailed explanations, to read this code.
void CBalloon::GetBalloonRgn(CRgn & windowrgn)
  {
   CRect empty;
   empty.SetRectEmpty();
   windowrgn.CreateRectRgnIndirect(&empty);

   CRect r;
   GetBalloonRect(r);

   CClientDC dc(this);
   dc.BeginPath();
   dc.Ellipse(&r);
   dc.EndPath();

   CRgn rgn;
   rgn.CreateFromPath(&dc);

   windowrgn.CombineRgn(&windowrgn, &rgn, RGN_OR);

   rgn.DeleteObject();

   CRect client;
   GetClientRect(&client);

   dc.BeginPath();
   dc.MoveTo(r.Width() / 2, r.Height() / 2);
   dc.LineTo(client.right, client.bottom);
   dc.LineTo(r.Width() / 2, r.Height());
   dc.CloseFigure();
   dc.EndPath();

   rgn.CreateFromPath(&dc);
   windowrgn.CombineRgn(&windowrgn, &rgn, RGN_OR);

   rgn.DeleteObject();
  } // CBalloon::GetBalloonRgn
The only remaining function that has to be defined for this is the function GetBalloonRect. This is where the values of w and h are defined; the value w is defined as 80% of the width, and the value h is defined as 75% of the height of whatever rectangle is passed in.
void CBalloon::GetBalloonRect(CRect & r)
  {
   GetClientRect(&r);
   r.bottom = (int) ((double)r.Height() * 0.75);
   r.right = (int) ((double)r.Width() * 0.80);
  } // CBalloon::GetBalloonRect
OK, so now we know how to create the popup, but we need to deal with when to create it and where to create it. The when is easy: when the user clicks the mouse down on the cat's tail. The where is a bit trickier.
Note in the layout there is a static frame control to the left of the Gray Cat's head. This satisfies the question of where. But that where is relative to the client area of the dialog. That's not the coordinates we need to use to create the popup. I called this box IDC_BALLOON_AREA and associated it with the variable c_Balloon.
void CWindowRegionDlg::OnTailDown()
  {
   c_Head.SetMood(CHead::STARTLED);                             // [1]
   c_Mew = new CBalloon;                                        // [2]
   CRect r;                                                     // [3]
   c_Balloon.GetWindowRect(&r);                                 // [4]

   c_Mew->Create(_T("m"), _T("Symbol"), WS_VISIBLE, r, this);   // [5]
} // CWindowRegionDlg::OnTailDown
| Line | Explanation |
| 1 | The cat gets a startled look on her face |
| 2 | I create a new instance of the CBalloon class and
store it in a pointer member variable CBalloon * c_Mew; which had been set in the CWindowRegionDlg constructor to hold the value NULL. |
| 3 | I declare a rectangle that will hold the desired coordinates of the window |
| 4 | I get the location of the window. However, I get the window rectangle, which is given in screen coordinates. Screen coordinates are what are required to position the popup window. |
| 5 | I call my Create method, as a visible window, with the current window as its parent. |
We are making progress. We get the "" balloon, but if we were to drag the cat around, the balloon would stay where it was created. And we need to make it go away.
void CWindowRegionDlg::OnTailUp()
  {
   c_Head.SetMood(CHead::HAPPY);
   if(c_Mew != NULL)
     { /* stop mewing */
      c_Mew->DestroyWindow();
      c_Mew = NULL;
     } /* stop mewing */
  } // CWindowRegionDlg::OnTailUp
Note that I did not bother to delete the CBallon object. This is because I handle this in PostNcDestroy
void CBalloon::PostNcDestroy()
  {
   CWnd::PostNcDestroy();
   delete this;
  }
To paint the text, I use the usual OnPaint handler
void CBalloon::OnPaint()
  {
   CPaintDC dc(this); // device context for painting

   CRgn rgn;                          // [1]
   GetBalloonRgn(rgn);                // [2]

   CBrush br;                         // [3]
   br.CreateStockObject(BLACK_BRUSH); // [4]

   dc.FrameRgn(&rgn, &br, ::GetSystemMetrics(SM_CXBORDER), ::GetSystemMetrics(SM_CYBORDER)); // [5]

   CString text;
   GetWindowText(text);               // [6]

   CRect r;
   GetBalloonRect(r);                 // [7]

   dc.SelectObject(&font);            // [8]
   CSize sz = dc.GetTextExtent(text); // [9]

   dc.SetBkMode(TRANSPARENT);         // [10]
   dc.SetTextColor(::GetSysColor(COLOR_INFOTEXT));  // [11]
   dc.SetTextAlign(TA_CENTER);        // [12]
   dc.TextOut(r.Width() / 2,          // [13]
              r.Height() / 2 - sz.cy / 2,
              text);

   // Do not call CWnd::OnPaint() for painting messages
  }
| Line | Explanation |
| 1 | I declare an uninitialized region variable. |
| 2 | I call the GetBallonRgn function I wrote to obtain the balloon region. This will be required to outline the window. |
| 3 | I declare a brush to paint the border of the window. I have decided that I want it outlined in black. |
| 4 | To do this, I simply ask to use the built-in "stock" BLACK_BRUSH |
| 5 | I use FrameRgn to draw the outline around the region. |
| 6 | I get the text I want to show |
| 7 | To determine where to position the text, I obtain the bounding rectangle of the ballon itself |
| 8 | I select the font into the DC so I can compute the text dimensions with respect to that font. |
| 9 | Here I also need to center vertically, which is something beyond what TA_CENTER allows me to do. So I compute the CSize (width and height) of the text. |
| 10 | I SetBkMode to be TRANSPARENT so I do not need to worry about text background color. |
| 11 | I choose to use the user's selection of the color for popup help text, COLOR_INFOTEXT |
| 12 | I use SetTextAlign to indicate that the text should be centered horizontally relative to the text origin specified in TextOut. |
| 13 | I write out the text. It is centered in the rectangle defining the balloon. The TA_CENTER centers it horizontally, and the computation of the y-axis value, using sz.cy / 2 to center the text vertically. |
One of the first things you would notice if you did the naive implementation shown for the OnLButtonDown and OnLButtonUp handlers is that if you click on the cat's tail and move the mouse away from the tail, you will not get the mouse-up notification. This is because mouse notifications are sent to the window under the cursor.
To ensure that I would get the mouse-up notifications, I "captured" the mouse. The SetCapture call directs Windows to send all mouse notifications to the window that has the capture. Thus, it is possible for that window to track the mouse. This is most commonly used when there is some form of dragging going on.
void CCatTail::OnLButtonDown(UINT nFlags, CPoint point)
  {
   GetParent()->SendMessage(WM_COMMAND, (WPARAM)MAKELONG(GetDlgCtrlID(), CT_LBUTTONDOWN), (LPARAM)m_hWnd);

   SetCapture();

   CStatic::OnLButtonDown(nFlags, point);
  }
If you set capture, you must release capture. So I had to modify the OnLButtonUp hander to be
void CCatTail::OnLButtonUp(UINT nFlags, CPoint point)
  {
   if(GetCapture() != NULL)
     { /* had capture */
      ReleaseCapture();

      GetParent()->SendMessage(WM_COMMAND, (WPARAM)MAKELONG(GetDlgCtrlID(), CT_LBUTTONUP), (LPARAM)m_hWnd);
     } /* had capture */
   CStatic::OnLButtonUp(nFlags, point);
  }
Note that in this case, I only send the parent notification for button-up if I had already sent the parent notification for button-down. This means if you click the mouse down outside the tail, them move the mouse into the tail and release it, you will not see a gratuitous button-up notification.
I do not need to supply an OnEraseBkgnd handler because when I registered the window class, I specified (HBRUSH)(COLOR_INFOBK + 1) as the desired background color. Therefore, the built-in WM_ERASEBKGND handler will paint the window the correct color.
However, suppose I wanted to actually use my own painting on the background. Remember the problem with the OnEraseBkgnd handler for the buttons. In this case, we had to create a clipping region. But the reason was that the DC was based on the CS_PARENTDC style of the CButton. But if we want to paint the background a specific color, such as bright yellow, the OnEraseBkgnd handler is quite simple:
BOOL CBalloon::OnEraseBkgnd(CDC* pDC)
  {
   CRect r;
   GetClientRect(&r);
   pDC->FillSolidRect(&r, RGB(255, 255, 0));
   return TRUE;
  }
Note that there was no need to create a clipping region, because the clipping region in the DC is the exact window description, not the description of the clipping region of its parent. So with no more code than the above lines, the result would be as shown below. Note there is no "spillage". While the entire rectangle of the nominal underlying window is filled, only the parts clipped by the window region are actually displayed.
Note that because this is a popup, it can appear in front of its parent window.
 |
This application presents a possibly unusual problem: if I drag the cat while she is mewing, the mew balloon stays where I created it. This is how Windows is supposed to work. The problem here is that isn't how I want to to work. So I need to drag the popup window around with the main window.
I deal with this by using the OnMove handler in the main window. Using the same basis as I used to place the window originally, I determine where it should be moved to, and move it there. Note that I only try to move the window if it exists.
void CWindowRegionDlg::OnMove(int x, int y)
  {
   CDialog::OnMove(x, y);

   CRect mew;
   if(c_Mew != NULL)
      { /* move mew */
       CRect mewframe;
       c_Balloon.GetWindowRect(&mewframe);
       c_Mew->SetWindowPos(NULL, mewframe.left, mewframe.top,
                           0, 0,
                           SWP_NOSIZE | SWP_NOZORDER);
     } /* move mew */
}
So having done all the changes to make the windows draggable, I found that nothing actually happened. If I clicked on the cat's tail and tried to drag, there was no motion. Why?
This was because I did a SetCapture to ensure that I would see the WM_LBUTTONUP, even if the mouse were outside the window. So the tail is getting the messages, not the cat herself!
But the semantics of moving the mouse when it has been captured by the cat's tail are well-defined. In general, you would not want to use this technique to do an interface, but here we actually know we want to drag the parent window around. It isn't too hard to add this functionality.
The problem here is that we need to move the position of the parent window, but we might be anywhere in the cat's tail when we click. Fortunately, we can just do a little bit of coordinate arithmetic to compensate for this.
To do this, I need a CPoint that holds the relative offset of the initial mouse click in the cat's tail from the window coordinate of the parent window. So I declare, in the CCatTail class, a member variable
protected:
    CPoint offset;
Then I modify the OnLButtonDown handler once more:
void CCatTail::OnLButtonDown(UINT nFlags, CPoint point)
  {
   GetParent()->SendMessage(WM_COMMAND, (WPARAM)MAKELONG(GetDlgCtrlID(), CT_LBUTTONDOWN), (LPARAM)m_hWnd);
   CPoint where = point;                 // [1]
   ClientToScreen(&where);               // [2]

   CRect parent;                         // [3]
   GetParent()->GetWindowRect(&parent);  // [4]
   offset.x = parent.left;               // [5]
   offset.y = parent.top;
   offset -= where;                      // [6]

   SetCapture();

   CStatic::OnLButtonDown(nFlags, point);
  }
| Line | Explanation |
| 1 | I make a copy of the input parameter. While I could have applied the transformations directly to point, it is easier to see what is going on while debugging if the original values are maintained and the changes are made in a copy. |
| 2 | I convert the coordinates of the mouse, which are relative to the client area, to screen coordinates, relative to the 0,0 coordinate of the screen. |
| 3 | I declare a variable which will hold the parent window coordinates |
| 4 | I obtain the parent window coordinates. GetWindowRect gives me screen coordinates. |
| 5 | I store the top left corner of the parent window in the offset variable. |
| 6 | I subtract the current mouse position from the window coordinates to compute the relative offset between the mouse position and the top left corner of the window. Note two things: (1) Although we have a funny-shaped window, Windows itself still thinks of the window as rectangular for many purposes, such as setting its position (2) because we did ClientToScreen in line 2, we are truly subtracting the correct units, screen coordinates from screen coordinates. |
The result of this computation is that I now know the relative position of the parent window from the mouse. Then I used ClassWizard to add an OnMouseMove handler to the CCatTail class. Because of the SetCapture, the CCatTail instance will receive all mouse events, including mouse-move events.
void CCatTail::OnMouseMove(UINT nFlags, CPoint point)
  {
   // Figure out how far to move the window
   if(GetCapture() != NULL)                                  // [1]
      { /* has capture */
       CPoint pt = point;                                    // [2]
       ClientToScreen(&pt);                                  // [3]
       pt += offset;                                         // [4]
       GetParent()->SetWindowPos(NULL,         // z-order    // [5]
                                 pt.x, pt.y,   // position
                                 0, 0,         // size
                                 SWP_NOSIZE | SWP_NOZORDER); // operations to ignore
     } /* has capture */
   //CCatPart::OnMouseMove(nFlags, point);                   // [6]
  }
| Line | Explanation |
| 1 | The cat tail will get WM_MOUSEMOVE messages any time the mouse moves over it, whether it is clicked or not. However, we want to execute the following code only if we are in a dragging mode, which means that we have capture. You might ask "Why did you think it adequate to test == NULL? Shouldn't you have tested == this?" The answer lies in the fact that we have mouse capture. If the capture was not to this window, we would not see the mouse-move event! If we see it, it is either because we have capture or we do not. If we do not have capture, then GetCapture will have to return NULL. If we do have capture, GetCapture will return a non-NULL value. It would be impossible to get into this handler if some other window had capture, so if it is non-NULL, that is a sufficient test! |
| 2 | I make a copy of the input parameter. While I could have applied the transformations directly to point, it is easier to see what is going on while debugging if the original values are maintained and the changes are made in a copy. |
| 3 | I convert the coordinates of the mouse, which are relative to the client area, to screen coordinates, so we can use them in subsequent operations. |
| 4 | I add the offset to the transformed pt value. Because of how the computations worked, adding the neative offsets will give the top left corner of the parent window (work it out, or study it in the debugger if you don't believe me). |
| 5 | I then call SetWindowPos to move the position. I prefer this to MoveWindow if I am only changing the size, or changing the position. I specify SWP_NOSIZE to indicate that size parameters are to be ignored, and SWP_NOZORDER to indicate the z-order window handle should be ignored. |
| 6 | Because I have done everything I need to do, I removed the call to the superclass handler |
This looked like a trivial example. But a lot of Windows techniques were brought to bear to create an interesting solution. This essay walks you through a set of design decisions and interesting technologies, and studies the interactions of various decisions, both those made by Microsoft and those you make yourself. Overall, this is a good little example for showing lots of aspects of Window design.
1A typical example of an outrageous story: The Little Gray Cat and I were passing a construction area, where we saw the local utility company was cutting down utility poles in the area, cutting them into about four-foot lengths, and stacking them on a truck to carry away. A new pole had replaced them. She asked "I wonder what they do with those poles". I explained that utility poles were an important cash crop. Every 30 years or so, the crop is harvested, and like several other plants, the plant can only give one crop, and then it dies. The crop is those little glass-like devices on the top, which have nice electrical properties. Like sugar cane and other crops, those four-foot sections are taken back to the utility pole farm and planted. Each section then grows a new pole. When they reach a certain size, they can be transplanted from the farms, which are not idea growing conditions, to the natural habitat of utility poles, the city, where they spend the next 30 years maturing. They are fertilized by squirrels (did you ever see squirrels running along utility lines and wonder what they were doing there? They are part of the urban ecology in which these poles grow).
I gave all this explanation while we were riding in one day on the bus, and I thought it odd that after a while people began distancing themselves from us...
![]()
The views expressed in these essays are those of the author, and in no way represent, nor are they endorsed by, Microsoft.