
An Image Comparison Program
| Home | |
 |
Back To Tips Page |
|
An Image Comparison Program |
|
I have recently been preparing some lectures in digital document preservation. My particular areas of discussion are in comparison, image quality, and electronic document authentication.
To do the lecture on image quality, I wanted to show how various forms of compression degrade the quality of the image. I did one experiment using Corel PhotoPaint, but it was a tedious experiment, and I didn't want to do it more than once. So, being an incredibly lazy programmer, I wrote a program that would do it for me. The result was my Image Comparator program.
Besides being a cute artifact in its own right, it shows some techniques of digital manipulation of image, and the use of the CImage class.
The program is not complete, but it is as complete as it is going to get for a while. I may add new features or complete the current feature set in the future.
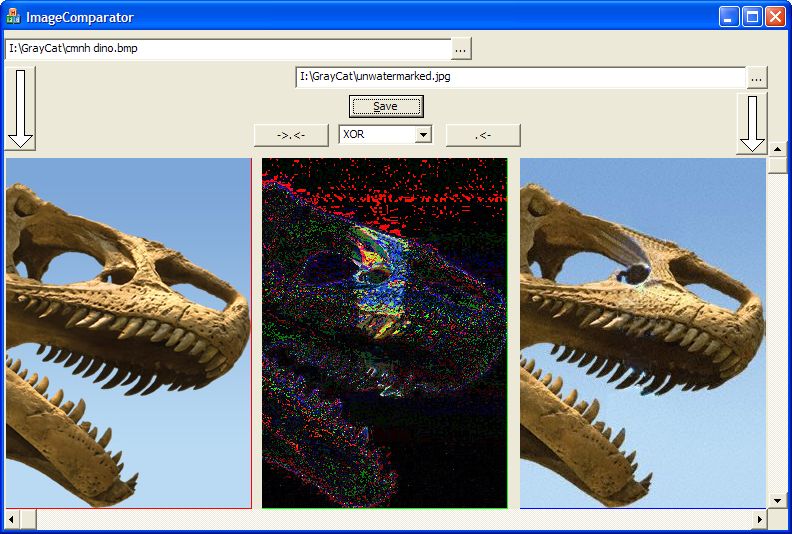
The basic idea is that I can read two pictures into the program and compare them using a variety of operations; the only two interesting ones seem to be XOR and XOR-enhanced (more about enhancement later!)
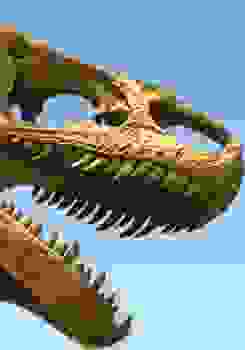
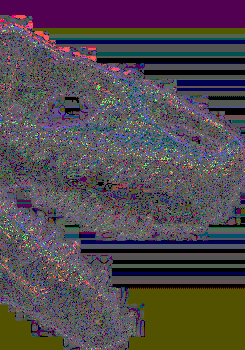
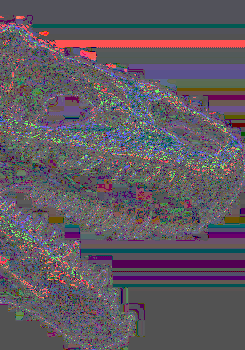
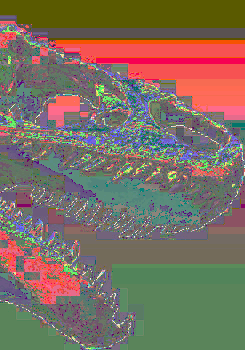
This illustration shows the effects of converting a 24-bit BMP representation to an 8-bit GIF representation, and represents the loss of color information in the 24-bit-to-8-bit conversion

The idea here is that "black" nominally represents the area of "no difference". The left pictures is the original 24-bit image, the right picture is an 8-bit GIF image. <blatant_plug style="noncommercial">The dinosaur image was taken from the Carnegie Museum of Natural History Web site (www.carnegieMNH.org) and if you are ever in Pittsburgh, you really need to go see their new dinosaur exhibit.</blatant_plug>. However, if I enter a mode where I enhance the low-level colors (arbitrarily, any RGB component such that 0 < GetXvalue < 80), we see the lossage is actually much greater than the above image would suggest

Note there is no actual "black" in the above image, and that's because there wasn't any actual "black" in the first image, just very dark colors.
As part of my discussion, I was illustrating watermarking. I used Corel PhotoPaint to "OR" in an image of the Carnegie Museum of Natural History logo to show how an overt watermark would work. I used a fairly low-resolution image, but got something that illustrates how a watermark might work
I then pointed out that it was possible to have someone who was a moderately skilled artist "erase" the watermark. I did a somewhat poor job of doing this, because "moderately skilled artist" is not really in my skill set, and I got what superficially looks like a convincing image (I only spent 20 minutes doing the editing; you should be able to spot my obvious mistake)
I got a very interesting result when I wrote my image comparator program and compared the two images, the original image (on the left) and the dewatermarked image (on the right). The watermark came back!
The other thing I illustrated was the degradation due to JPEG compression. Corel PhotoPaint has levels of compression from 0 to 100, where 100 is the strongest compression. You can see the very apparent degradation in the last image, but it is worth noting the degree of degradation at each of the other levels. The left-hand image was a 24-bit uncompressed .bmp file (I did an uncompressed jpeg for this site so you wouldn't have to spend forever waiting for the page to download), the other images are 24-bit color with different degrees of JPEG compression.
 |
 |
 |
 |
 |
 |
| Original image | JPEG "20" compression | JPEG "40" compression | JPEG "60" compression | JPEG "80" compression | JPEG "100" compression |
|
257,654 bytes |
16,563 bytes |
12,288 bytes |
8,779 bytes |
5,826 bytes |
1,498 bytes |
|
Enhanced difference |
 |
 |
 |
 |
 |
If you are not a programmer, you can stop reading at this point.
I wanted to use the CImage class because it can read all interesting graphics formats, such as .BMP, .GIF, .JPG/.JPEG, .PNG and .TIFF. So I created a class CPicture:
class CPicture : public CStatic
{
        DECLARE_DYNAMIC(CPicture)

public:
        CPicture();
        virtual ~CPicture();
        COLORREF bkcolor;
        HRESULT Load(const CString & filename);
        HRESULT Save(const CString & filename, REFGUID guid = GUID_NULL);
        void MakeTarget(int cx, int cy);
        void MakeTarget(const CPicture & source);
        void Transfer(const CPicture & source, UINT mode);
        BOOL IsValid() { return !image.IsNull(); }
protected:
        DECLARE_MESSAGE_MAP()
        CImage image;
        void Enhance();
protected:
    afx_msg void OnPaint();
};
The idea was that I would have the CPicture control handle all the loading and saving of images.
HRESULT CPicture::Load(const CString & filename)
    {
     if(!image.IsNull())                       // [1]
         image.Destroy();                      // [2]

     HRESULT result = image.Load(filename);    // [3]
     if(FAILED(result))                        // [4]
        return result;                         // [5]

     Invalidate();                             // [6]
     return result;                            // [7]
    } // CPicture::Load
[1] The CImage::Load is going to try to create a new bitmap image, I have to delete any existing image; CImage::IsNull tells me if I have one or not
[2] Call CImage::Destroy to delete an existing image
[3] Load the image from the specified file name. The file name can be any file type supported by the CImage class
[4] If it failed, return the failure code. Note the use of the FAILED macro, not a test to see if result == S_OK, because successful return is not necessarily S_OK
[5] return the code to indicate success or failure
[6] This class is derived from CStatic (with the SS_BITMAP flag set), so I want it to redraw if the load succeeded.
[7] Return the SUCCEEDED result
void CPicture::OnPaint()
    {
     CPaintDC dc(this); // device context for painting    // [1]

     CRect r;
     GetClientRect(&r);                                   // [2]
     dc.FillSolidRect(&r, bkcolor);                       // [3]

     if(!image.IsNull())                                  // [4]
        { /* draw bitmap */
         CRgn rgn;                                        // [5]
         int save = dc.SaveDC();                          // [6]
         rgn.CreateRectRgnIndirect(&r);                   // [7]
         dc.SelectClipRgn(&rgn);                          // [8]
         image.BitBlt(dc, 0, 0, image.GetWidth(), image.GetHeight(), 0, 0, SRCCOPY);   // [9]
         dc.RestoreDC(save);                              // [10]
        } /* draw bitmap */
    }
The OnPaint handler is remarkably simple. The only problem I had was that if the bitmap size exceeds the size of the control, the image "spills over" onto the surface of the dialog. This is because controls prior to Vista used the style CS_PARENTDC, which I have always felt was due entirely to erroneous design, which means that the clipping region of the DC is not the control, but the parent of the control. I'm not even sure how this could have ever been construed to make sense. So rather than go through a lot of work to truncate the image, I let GDI+ do it for me, by simply setting a clipping region equal to the client area.
[1] The traditional CPaintDC
[2] GetClientRect gives me a rectangle which is the entire client area. Note that the clipping region might be smaller than this area, but I don't particularly care.
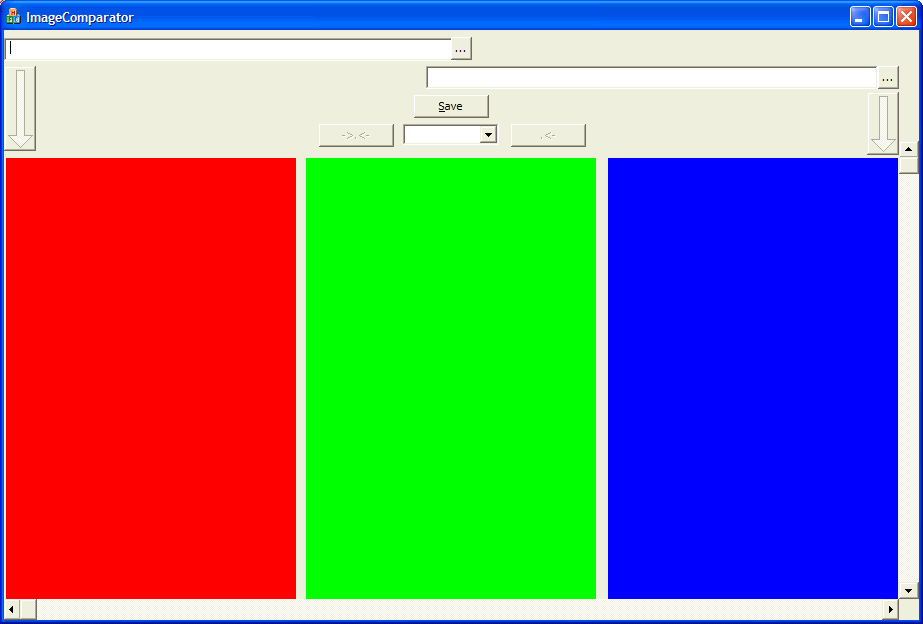
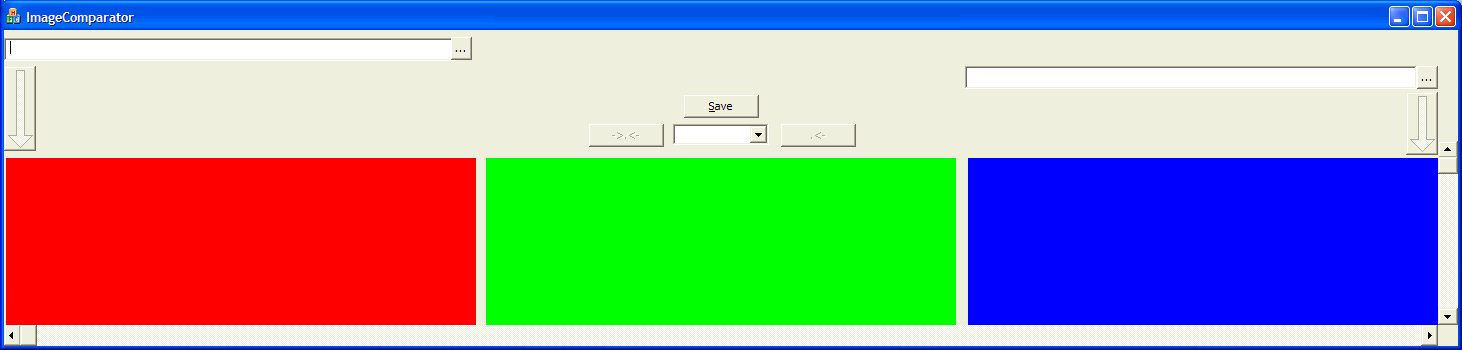
[3] I use CDC::FillSolidRect to paint an empty background. In the application, I set the backgrounds to be red (RGB(255,0,0)), green (RGB(0,255,0)) or blue (RGB(0,0,255))
[4] If there is not a bitmap to draw, don't try to draw one (it will generate assertion errors)
[5] Create a CRgn to represent the clipping area and restrict it to the client area of the control
[6] Save the current DC state. This way I don't need to save any results of modifying the DC state
[7] Create a clipping region equal to the client area
[8] Select the clipping region into the DC. This will limit drawing to the client area of the CStatic
[9] Draw the bitmap in the CImage into the DC
[10] Restore the DC, thus deselecting the clipping region. This way, when the CRgn::~CRgn is executed as we leave the scope the HRGN object will actually be deleted
The file save code is really simple!
HRESULT CPicture::Save(const CString & filename, REFGUID type /* = GUID_NULL */)
    {
     REFGUID fmt = (type == GUID_NULL ? Gdiplus::ImageFormatBMP : type);

     HRESULT result = image.Save(filename, fmt);
     return result;
    } // CPicture::Save
I did not provide a feature in the caller to write other than a .BMP file, because I did not want to spend time discovering how to set JPEG compression factor, or deal with 24-to-8 bit conversions dealing with .GIF files.
This transfers an image from one CPicture object to another.
void CPicture::Transfer(const CPicture & source, UINT mode)
    {
     if(source.IsNull())                  // [1]
        return;                           // [2]
     if(!MakeTarget(source))              // [3]
        return;                           // [4]

     HDC dc = image.GetDC();              // [5]
     UINT rop = mode & ~ENH_FLAG;         // [6]
     source.image.BitBlt(dc, 0, 0, source.image.GetWidth(), source.image.GetHeight(), 0, 0, mode);  // [7]

     if(mode & ENH_FLAG)                  // [8]
        Enhance();                        // [9]
     image.ReleaseDC();                   // [10]
     Invalidate();                        // [11]
    } // CPicture::Transfer
The mode parameter tells how the source image is to be transferred to the target, and values such as SRCCOPY, SRCINVERT (XOR), and SRCPAINT (OR) are interesting. I added the ability to do an "enhanced" transfer, where I post-process the data to make differences more apparent. To do this, I defined an ENH_FLAG bit which is not part of the normal ROP codes (0x80000000) so I can use it to include enhanced-mode processing.
[1] If the source does not have an image, we should not be here, but we test anyway
[2] If there was no source image, just return. In a piece of production code, it might be better to ::SetLastError(ERROR_INVALID_PARAMETER) first.
[3] Make sure there really is a bitmap to transfer it to
[4] If we fail to create a bitmap, return
[5] There is no CDC::CImageDC class similar to CDC::CClientDC; this is an unfortunate oversight in the design, forcing us to use CImage::GetDC. This is really ugly.
[6] I strip off my "enhanced processing" request flag, if it were present.
[7] Transfers the image from the source image to the image of this control.
[8] If enhanced processing is requested, plan to do image enhancement
[9] Call the Enhance method to artificially enhance the image
[10] Release the DC
[11] Invalidate the control so the image repaints now that it has been modified
This makes sure the CImage actually has a bitmap, by specifying the desired size of the bitmap
BOOL CPicture::MakeTarget(int cx, int cy)
    {
     if(!image.IsNull())                                  // [1]
        { /* see if already there */
         if(image.GetWidth() == cx &&                     // [2]
            image.GetHeight() == cy)
            return TRUE; // already exists                // [3]
         image.Destroy(); // get rid of wrong-sized image // [4]
        } /* see if already there */

     if(!image.Create(cx, cy, 24))                        // [5]
        return FALSE;                                     // [6]
     Invalidate();                                        // [7]
     return TRUE;                                         // [8]
    } // CPicture::MakeTarget
[1] If there is already an bitmap, we may be able to simply use the bitmap that is there
[2] Check to see if the existing bitmap has the same dimensions
[3] If a bitmap of the correct size already exists, we don't need to do anything
[4] If the bitmap exists but has the wrong size, call CImage::Destroy to destroy it
[5] Attempt to create a bitmap of the specified dimensions. This program only works with 24-bit bitmaps
[6] If the attempt to create the bitmap fails, return FALSE
[7] Invalidate the window to force it to redraw
[8] The bitmap has been successfully created
To simplify the use of this, I wrote an overloaded interface (note that the CPicture::image member is protected so a caller from outside the class would not be able to access the width and height calls of CImage::image)
BOOL CPicture::MakeTarget(const CPicture & source)
    {
     return MakeTarget(source.image.GetWidth(), source.image.GetHeight());
    } // CPicture::MakeTarget
This is one where I could try lots of interesting ideas, but the current implementation is sufficient for my needs. All I wanted to do here was enhance the "dark" colors so they could be readily seen. Other algorithms might involve multiplying the low-order 2 bits by some value to make differences even more apparent.
void CPicture::Enhance()
    {
     for(int x = 0; x < image.GetWidth(); x++)                              // [1]
        for(int y = 0; y < image.GetHeight(); y++)                          // [2]
           { /* scan image */
            COLORREF color = image.GetPixel(x, y);                          // [3]
#define ENHANCEVALUE(x) (((x) == 0) ? 0 : (((x) < 80) ? ((x) + 80) : (x)))  // [4]
            COLORREF enhanced = RGB(                                        // [5]
                                    ENHANCEVALUE(GetRValue(color)),         // [6]
                                    ENHANCEVALUE(GetGValue(color)),         // [7]
                                    ENHANCEVALUE(GetBValue(color)));        // [8]
            image.SetPixel(x, y, enhanced);                                 // [9]
           } /* scan image */
    } // CPicture::Enhance
[1] I do this pixel-by-pixel because this was a quick-and-dirty program. If I cared about performance, I would capture the bitmap and work directly on the bits in memory. This goes across each row.
[2] Go across each column
[3] Pick up the COLORREF representing the pixel at the x,y coordinate
[4] Define the (currently one-and-only) enhancement formula: any nonzero value in the range of 1..80 has 80 added to it. There's nothing really deep about the choice of these numbers
[5] Compute a new COLORREF which is the transform of each of the component values of the current pixel color
[6] Apply the transformation to the red value
[7] Apply the transformation to the green value
[8] Apply the transformation to the blue value
[9] Replace the pixel with the enhanced pixel (or the original pixel if all values were > 80). I could trivially optimize this by doing it only if enhanced != color but it wasn't worth the effort
I wanted to allow scrolling of the images, but decided I didn't have the time to implement the scroll bar logic. I also wanted to be able to resize the images so I didn't have to scroll, but I didn't want to use StretchBlt (which adds additional distortion to the images shown), so what I had to allow was the ability to resize the windows. While not a perfect solution, it isn't too bad for small examples. However, I wanted the controls to "float" as well.
Note that the gap between the images remains the same, the images adjust width and height to fit, the scroll bars (which are separate controls) move with the resizing, the Save button and operations buttons and controls remain centered over the middle image (which is what they affect). This is all rather simple geometry.
This is handled in the OnSize handler. However, if I use SetWindowPos to reposition the windows, the results are amazingly ugly. Even with WS_CLIPCHILDREN and WS_CLIPSIBLINGS styles set, there are truly ugly artifacts of moving the windows around. So what I use is a capability called "Deferred Window Positioning". What I do is incorporate this code in a function DoDeferredResize. This function is called as
void CImageComparatorDlg::SizeWindows(int cx, int cy)
    {
     HDWP deferred = ::BeginDeferWindowPos(9); // first guess                       // [1]
     DoDeferredResize(deferred, cx, cy);                                            // [2]
     ::EndDeferWindowPos(deferred);                                                 // [3]
    } // CImageComparatorDlg::SizeWindows
This is called from the OnSize handler.
[1] Create an HDWP (deferred window position handle). You can estimate how many windows it is supposed to handle, and at one point, I counted 9 windows I was resizing. Overestimating is harmless, and underestimating might create a minor inefficiency as it reallocates internally, so I just picked a number that was good enough
[2] Call the function which will compute new deferred window positions
[3] Cause the windows to actually redisplay. This computation is going to be optimized for dealing with overlapping windows and the result will not have ugly artifacts of the resizing
The function starts out by getting the dimensions of the scrollbars
void CImageComparatorDlg::DoDeferredResize(HDWP & deferred, int cx, int cy)       // [1]
    {
     if(c_HScroll.GetSafeHwnd() == NULL)
        return;

     CRect hscroll;
     c_HScroll.GetWindowRect(&hscroll);
     ScreenToClient(&hscroll);

     if(c_VScroll.GetSafeHwnd() == NULL)
        return;

     CRect vscroll;
     c_VScroll.GetWindowRect(&vscroll);
     ScreenToClient(&vscroll);
The important thing to note here is at [1], the input parameter is an HDWP & parameter, which means the parameter is passed by reference and the value seen by the caller will be modified by any assignment. This is much nicer than writing HDWP * and having to write, everywhere, *deferred = to do an assignment, but has exactly the same effect. Essentially, all I do here is capture the dimensions of the scrollbar because they will be used in subsequent computations.
Here's the computation of the three image sizes
     int gap = 6 * ::GetSystemMetrics(SM_CXEDGE);                                   // [1]

     int width = (cx - 2 * gap - vscroll.Width()) / 3;                              // [2]

     if(c_Image1.GetSafeHwnd() != NULL)
        { /* image 1 */
         CRect image1;                                                              // [3]
         c_Image1.GetWindowRect(&image1);                                           // [4]
         ScreenToClient(&image1);                                                   // [5]

         deferred = ::DeferWindowPos(deferred,                                      // [6]
                                     c_Image1.m_hWnd,                               // [7]
                                     NULL,                                          // [8]
                                     0, 0,                                          // [9]
                                     width, (cy - image1.top - hscroll.Height()),   // [10]
                                     SWP_NOMOVE | SWP_NOZORDER);                    // [11]
        } /* image 1 */

     if(c_ImageDelta.GetSafeHwnd() != NULL)
        { /* image delta */
         CRect imageDelta;
         c_ImageDelta.GetWindowRect(&imageDelta);
         ScreenToClient(&imageDelta);


         deferred = ::DeferWindowPos(deferred,
                                     c_ImageDelta.m_hWnd,
                                     NULL,
                                     (width + gap), imageDelta.top,                   // [12]
                                     width, (cy - imageDelta.top - hscroll.Height()), // [13]
                                     SWP_NOZORDER);                                   // [14]
        } /* image delta */

     if(c_Image2.GetSafeHwnd() != NULL)
        { /* image 2 */
         CRect image2;
         c_Image2.GetWindowRect(&image2);
         ScreenToClient(&image2);

         deferred = ::DeferWindowPos(deferred,
                                     c_Image2.m_hWnd,
                                     NULL,
                                     (2 * (width + gap)), image2.top,                // [15]
                                     width, (cy - image2.top - hscroll.Height()),    // [16]
                                     SWP_NOZORDER);
        } /* image 2 */
[1] Compute a gap size. I prefer to do this in a display-independent fashion, so I usually use some display-specific parameter, such as the size of a "resizing edge" of a window. So I decided that 6 times this dimension looked nice. This will adapt to both low-resolution and high-resolution displays and give a reasonable gap.
[2] Given this gap, compute the desired width of each of the images. cx is the width of the client area. We take out the width of the vertical scrollbar, allow for two gaps, and the remaining space is available for images, of which we have three.
[3] Declare a CRect to get the dimensions of the window and its current position
[4] Use GetWindowRect to get the window rectangle, expressed in its screen coordinates
[5] Convert the result of GetWindowRect from screen coordinates to client coordinates in the current dialog
[6] Use the raw API ::DeferWindowPos to indicate the position of the new window. There is no MFC method for this. The first parameter is the existing HDWP and the value returned is a potentially different HDWP which will be used in subsequent computations.
[7] The second parameter is the HWND of the window to be resized
[8] This is the first parameter of a SetWindowPos method call and would be the window whose handle is the Z-order of the preceding window. Because we will not be changing Z-order, this will always be NULL
[9] The first window is not moved, so these parameters are ignored
[10] The desired width of the window is the width parameter computed earlier. The height will be to fill the entire bottom part of the window (cy - image1.top) less the height of the horizontal scroll bar
[11] The leftmost window does not move and remains in its current Z-order position
[12] The leftmost position of the middle window is width + gap, but the vertical position does not change
[13] The width and height computations are the same as in step [10]
[14] In this case we are both moving and resizing, so the only flag is SWP_NOZORDER
[15] The leftmost position of the rightmost window is 2 widths and 2 gaps from the left edge but at the same original position
[16] The size is as computed for step [10]
The other window motions are performed similarly. When this function returns, the ::EndDeferWindowPos will cause all of the windows to be properly repositioned with a minimum of fuss and graphical artifacts.
I don't want the window to size too small. This is handled easily by creating a "frame" control (a static picture control) which represents the minimum size I want the window to achieve. I change the name of the control from IDC_STATIC to IDC_FRAME, and mark its Visible property as FALSE. I then add an OnGetMinMaxInfo control to the dialog
void CImageComparatorDlg::OnGetMinMaxInfo(MINMAXINFO* lpMMI)
    {
     if(c_Frame.GetSafeHwnd() != NULL)            // [1]
        { /* limit size */
         CRect r;
         c_Frame.GetWindowRect(&r);               // [2]
         ScreenToClient(&r);                      // [3]
         CalcWindowRect(&r);                      // [4]
         lpMMI->ptMinTrackSize.x = r.Width();     // [5]
         lpMMI->ptMinTrackSize.y = r.Height();    // [6]
         return;                                  // [7]
        } /* limit size */
     CDialog::OnGetMinMaxInfo(lpMMI);             // [8]
    }
[1] Because a WM_GETMINMAXINFO message is sent very early in the window creation process, long before the controls have been created or bound to variables, it is important to see if there really is a window there. This tests to see that the frame window is bound to the variable
[2] Get the rectangle of the frame window (this is the IDC_FRAME that is our minimum limit)
[3] Convert the coordinates from screen coordinates to client coordinates in the current dialog
[4] Compute the size of the parent window that would be required to hold this minimum frame size (this accounts for the caption, menu, borders, etc.)
[5] Set the minimum width for mouse resizing to be the window width of the smallest reasonable window
[6] Set the minimum height for mouse tracking to be the window height of the smallest reasonable window
[7] That's all, return
[8] If we are in any of the default scenarios, during window creation, use the default handler
The dropdown list is an example of my CIDCombo class and the arrows which will load the files into the image boxes are part of my CArrowButton class. I believe in code reuse.
There are scroll bars, but I wrote no code for them. That's future work.
I could add an "alignment" control to nicely overlap the images in case there was an error, or I wanted to, for example, use the OR operation to create a watermark, but I didn't need to do that so it isn't there.
I could create other kinds of enhancements and pass the desired enhancement in as one of the parameters; this would mean I could eliminate the concept of the ENH_FLAG and have an open-ended set of transformations. I'm not trying to replicate PhotoShop, so the number I need are fairly minimal, but it might be fun to play with other kinds of transformations than the one I have here.

![]()
The views expressed in these essays are those of the author, and in no way represent, nor are they endorsed by, Microsoft.