
Inside the GradientFill Explorer
|
|
Home |
 |
Back To Tips Page |
|
|
Back to the GradientFill Explorer |
|
|
Inside the GradientFill Explorer |
|
This turned out to exercise some of my graphics skills. For example, the dropdown list of "canned" examples is one of my favorite toys, the Owner Draw Combo Box. However, getting it to work right involved some graphics tricks.
The itemData of each element is a VertexData value, loaded by enumerating all the VERTEX resources during OnInitDialog.
EnumResourceNames(AfxGetInstanceHandle(), _T("VERTEX"), VertexEnum, (LONG_PTR)this);
Note the "abitrary user parameter" is a pointer to this, the CGradientFillerDlg. The callback function is a static class member and as such as no direct access to any of the instance members, but this can be remedied by using the LONG_PTR parameter
/* static */ BOOL CALLBACK CGradientFillerDlg::VertexEnum(HMODULE module, LPCTSTR type, LPTSTR name, LONG_PTR lParam)
    {
     VertexData * vd = new VertexData;
     if(vd->LoadVertexResource(module, name, type))
        { /* got it */
         CGradientFillerDlg * me = (CGradientFillerDlg *)lParam;
         me->c_Samples.AddString((LPCTSTR)vd);
        } /* got it */
     else
        { /* failed */
         delete vd;
        } /* failed */
     return TRUE;
    } // CGradientFillerDlg::VertexEnum
In the DrawItem handler of the CComboBox-derived class, I wanted to scale the image to fit entirely in the small space of the selection area. I did not want to actually expand the combo box items to be as large as the images, but in effect show a "thumbnail". I was initially dismayed when I saw that the images were not being displayed properly; only the first image appeared, but none of the others did. Their apparent area was just plain white. Then I realized that the reason is that GradientFill would start the images at the nominal 0,0 point, and I wanted to draw them in the desired area. The trick was therefore to simply adjust the viewport origin to the rectangle being displayed.
void CGradientList::DrawItem(LPDRAWITEMSTRUCT dis)                         // [1]
    {
     CDC * dc = CDC::FromHandle(dis->hDC);                                 // [2]
     CRect rect = dis->rcItem;                                             // [3]

     if(dis->itemID != (DWORD_PTR)-1)                                      // [4]
         { /* has vertex */
          int save = dc->SaveDC();                                         // [5]

          VertexData * vd = (VertexData*)dis->itemData;                    // [6]

          LPTRIVERTEX vertex;                                              // [7]
          ULONG vertexCount;                                               // [7]
          LPVOID mesh;                                                     // [7]
          ULONG meshCount;                                                 // [7]
          ULONG mode;                                                      // [7]

          BOOL ok = vd->FromBinary(vertex, vertexCount, mesh, meshCount, mode); // [8]

          CRgn rgn;                                                        // [9]
          rgn.CreateRectRgnIndirect(&rect);                                // [10]
          dc->SelectClipRgn(&rgn);                                         // [11]

          //****************************************************************
          // Scale the drawing to fit
          //****************************************************************
          CRect sz = vd->GetBoundingBox(vertex, vertexCount, mesh, meshCount, mode); // [12]

          dc->SetMapMode(MM_ANISOTROPIC);                                  // [13]
          dc->SetWindowExt(sz.Width(), sz.Height());                       // [14]
          dc->SetViewportExt(rect.Width(), rect.Height());                 // [15]
          dc->SetViewportOrg(rect.left, rect.top);                         // [16]

          dc->GradientFill(vertex, vertexCount, mesh, meshCount, mode);    // [17]

          vd->Release();                                                   // [18]

          dc->RestoreDC(save);                                             // [19]

          if(dis->itemState & ODS_SELECTED)                                // [20]
             { /* selection */
              int save = dc->SaveDC();                                     // [21]
              CPen pen(PS_DOT, 0, RGB(0,0,0));                             // [22]
              dc->SelectObject(&pen);                                      // [23]
              dc->SelectStockObject(HOLLOW_BRUSH);                         // [24]
              dc->Rectangle(&rect);                                        // [25]
              dc->RestoreDC(save);                                         // [26]
             } /* selection */
         } /* has vertex */
    }
An example showing the dropdown and the highlighting:

I was using an owner-draw ListBox originally for the vertex list (because I wanted to show the color), and for the GRADIENT_RECT and GRADIENT_TRIANGLE arrays (because I wanted to be able to directly edit the contents without having to delete-and-re-insert the string, which is the only way to handle this when the normal ListBox is used). However, I found a few cases where I wanted to temporarily remove a rectangle or triangle to see the effect. Deleting and re-inserting was painful, so I decided to add a check-box ListBox, the CCheckListBox class.
This pointed out a misfeature of my earlier code. When I drew the data, every item except the selected item came out correctly, but the selected item was always redrawn at the far left of the window. A bit of study showed me that I had to handle the case of ODA_FOCUS specially. The prolog of DrawItem had to be modified, so it now was:
void CGradientTriangleList::DrawItem(LPDRAWITEMSTRUCT dis)
   {
    CDC * dc = CDC::FromHandle(dis-&hDC);
    // Make a copy of the bounding rectangle so we can modify it if we desire

    CRect r = dis->rcItem;

    // Handle the case where the control is empty. Draw an empty focus rectangle to indicate the control has focus
    if(dis->itemID == (UINT)-1)
       { /* empty list */
        if(dis->itemState & ODS_FOCUS)
           dc->DrawFocusRect(&r);
        return;
       } /* empty list */

    if(dis->itemAction & ODA_FOCUS)
       { /* draw focus */
        dc->DrawFocusRect(&r);
        return;
       } /* draw focus */
I decided I wanted a way to see where a point was. I decided that the least obtrusive way to do this would be to "flash" a finder icon up on the place where the point was. The steps in the process of doing this were:
This whole effort was greatly simplified because clicking on a ListBox item sends a LBN_SELCHANGE notification even if the selection hasn't changed!. Otherwise, I would have had to use some sort of mouse-down detection in the subclassed ListBox class.
I added an interface to highlight a point
void CGradientImage::HighlightCoordinate(CPoint pt)
    {
     BoundingBox.left = pt.x - CIRCLE_SIZE;
     BoundingBox.right = pt.x + CIRCLE_SIZE;
     BoundingBox.top = pt.y - CIRCLE_SIZE;
     BoundingBox.bottom = pt.y + CIRCLE_SIZE;
     InvalidateRect(&BoundingBox);
     SetTimer(IDT_UNHIGHLIGHT, 350, NULL);
    } // CGradientImage::HighlightCoordinate
This is very simple code. It merely computes a "highlighting rectangle" and invalidates it, then sets a timer.
Next, I modified the OnPaint handler to add this code:
    if(result && !BoundingBox.IsRectEmpty())
       { /* has highlight */
        int save = dc.SaveDC();

        dc.SetROP2(R2_NOTXORPEN);
        dc.SelectStockObject(HOLLOW_BRUSH);
        dc.Ellipse(&BoundingBox);
        dc.MoveTo(BoundingBox.left, BoundingBox.top);
        dc.LineTo(BoundingBox.right, BoundingBox.bottom);
        dc.MoveTo(BoundingBox.right, BoundingBox.top);
        dc.LineTo(BoundingBox.left, BoundingBox.bottom);

        dc.RestoreDC(save);
       } /* has highlight */
This code only executes if the preceding GradientFill operation returned TRUE, the value in the variable result. I used the presence of anything in the BoundingBox rectangle to indicate that a highlight should be drawn.
The R2_NOTXORPEN means that the pixels will be modified not by just drawing the lines, but by complementing the bits of the pixels under the pen. This means the pen will stand out on either light or dark backgrounds.


Finally, I added an OnTimer handler. This invalidates the area, then clears the BoundingBox rectangle:
void CGradientImage::OnTimer(UINT nID)
    {
     switch(nID)
        { /* nID */
         case IDT_UNHIGHLIGHT:
            InvalidateRect(&BoundingBox);
            BoundingBox.SetRectEmpty();
            KillTimer(nID);
            break;
        } /* nID */
    } // CGradientImage::OnTimer
Since I no longer care about the timer at this point, I kill it.
After using the above for a few hours, I found that I was having to select a GRADIENT_RECT or GRADIENT_TRIANGLE then highlight each of its vertices in turn to see where each was. This struck me as a waste of time, so I generalized the algorithm to cause the CGradientImage::HighlightCoordinate to create a set of points to be highlighted:
void CGradientImage::HighlightCoordinate(CPoint pt)
    {
     CRect r(pt.x - CIRCLE_SIZE, pt.y - CIRCLE_SIZE, pt.x + CIRCLE_SIZE, pt.y + CIRCLE_SIZE);
     Highlights.Add(r);
     InvalidateRect(&r);
     SetTimer(IDT_UNHIGHLIGHT, 350, NULL);
    } // CGradientImage::HighlightCoordinate
The OnPaint handler now used the presence of any element in the array to draw the highlights:
    if(result && !Highlights.IsEmpty())
       { /* has highlight */
        int save = dc.SaveDC();

        dc.SetROP2(R2_NOTXORPEN);
        dc.SelectStockObject(HOLLOW_BRUSH);
        for(int i = 0; i < Highlights.GetSize(); i++)
           { /* draw each */
            dc.Ellipse(&Highlights[i]);
            dc.MoveTo(Highlights[i].left, Highlights[i].top);
            dc.LineTo(Highlights[i].right, Highlights[i].bottom);
            dc.MoveTo(Highlights[i].right, Highlights[i].top);
            dc.LineTo(Highlights[i].left, Highlights[i].bottom);
           } /* draw each */

        dc.RestoreDC(save);
       } /* has highlight */
The OnTimer now had to invalidate all the rectangles before emptying the array:
         case IDT_UNHIGHLIGHT:
            { /* unhighlight */
             for(int i = 0; i < Highlights.GetSize(); i++)
                InvalidateRect(&Highlights[i]);
             Highlights.RemoveAll();
             KillTimer(nID);
            } /* unhighlight */
            break;
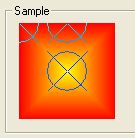
This screen shot shows what happens when I click the first element of the center-fill gradient, which has as its points 0, 1, 4. These represent the top left corner (0), the top middle (1), and the center (4) given the numbering I had assigned in the example.
If you need to be able to change values in a CListBox without having to remove and re-insert the item, an owner-draw ListBox is a good choice. This is because there is no actual string to update (this means you can't use the LBS_HASSTRINGS style). Therefore, you can simply change the structure you are working on. All that is required is to force the ListBox to actually redraw the updated information. This is very easy.
In addition, this makes actions such as "move item down" and "move item up" very straightforward. To move an item "up", you pick up its itemData and swap it with the itemData of its predecessor. To move an item "down", you swap its itemData with its successor.
To force a redraw, I created a method of the derived class, Invalidate, which takes as its argument the index of the item to be redrawn. For the CGradientTriangle list, it has the same form I use for all other similar classes:
void CGradientTriangleList::Invalidate(int sel)
    {
     CRect r;
     GetItemRect(sel, &r);
     InvalidateRect(&r);
    } // CGradientTriangleList::Invalidate
OK, there's nothing worse than being trapped in a hotel room for a couple days (see the Notes section) to bring out the worst excesses in a programmer. I wanted the About box to at least show some use of GradientFill. Alas, the icon is limited to the standard 256-color palette, which is quite horrible. But I could create a gradient bitmap for the Flounder image. But it wasn't as straightforward as I thought. The problem was the background color: you can't have transparent bitmaps or use LR_LOADMAP3DCOLORS or LR_LOADTRANSPARENTon 24-bit bitmaps. So I just created a Flounder-colored gradient, and edited away anything that didn't look like a Flounder. I used the same basic convention that the top left pixel (the 0,0) coordinate) was the "transparent" color. Then I just modified the bitmap to replace that color with ::GetSysColor(COLOR_3DFACE). It was only in retrospect that I realized that I could have used the standard icon and just replaced all the Flounder-colored pixels in the original bitmap with the corresponding gradient pixels in the gradient image. Then I could have simply used a solid gradient image with no editing at all.
BOOL CAboutDlg::OnInitDialog()
   {
    CDialog::OnInitDialog();

    HBITMAP bmp = (HBITMAP)::LoadImage(AfxGetInstanceHandle(), MAKEINTRESOURCE(IDB_FLOUNDER), IMAGE_BITMAP, 0, 0, LR_LOADMAP3DCOLORS);
    CClientDC client(this);
    CDC dc;
    dc.CreateCompatibleDC(&client);
    dc.SelectObject(bmp);

    BITMAP info;
    ::GetObject(bmp, sizeof(BITMAP), &info);

    COLORREF transparent = dc.GetPixel(0,0);
    COLORREF bk = ::GetSysColor(COLOR_3DFACE);

    for(int x = 0; x < info.bmWidth; x++)
        for(int y = 0; y < info.bmHeight; y++)
            { /* change pixels */
             COLORREF c = dc.GetPixel(x, y);
             if(c == transparent)
                dc.SetPixel(x, y, bk);
            } /* change pixels */
    c_Flounder.SetBitmap(bmp);
    return TRUE;  // return TRUE unless you set the focus to a control
                  // EXCEPTION: OCX Property Pages should return FALSE
   }
My "screen capture" essay describes how to capture the current window contents. However, this does not work if the window contents do not encompass all the information desired. So if I just captured the window contents of this display. it would appear as shown here:

but that is not actually the image that was created. It is truncated by the size of the window, and it has the background which is COLOR_3DFACE, which is not particularly useful. The actual image is

I also set the background to black. Currently, I do not have an interface that allows changing this setting.
Producing the complete bitmap involves creating a memory DC, selecting an appropriate-sized bitmap into it, and drawing into the DC. This is typically handled by the OnDraw member of the derived CView class. But this is a dialog-based app with no view. Other than having to explicitly implement the calls, however, the logic is essentially the same as the MFC document/view framework.
The common drawing logic is a subroutine shared by both the OnPaint and ToClipboard methods.
void CGradientImage::DoGradientFill(CDC & dc)
    {
     int save = dc.SaveDC();

     PVOID p;
     ULONG num;
     switch(mode)
        { /* mode */
         case GRADIENT_FILL_RECT_H:
         case GRADIENT_FILL_RECT_V:
            p = Rectangles.GetData();
            num = Rectangles.GetSize();
            break;
         case GRADIENT_FILL_TRIANGLE:
            p = Triangles.GetData();
            num = Triangles.GetSize();
            break;
         default:
            return;
        } /* mode */

     BOOL result = dc.GradientFill(Vertices.GetData(),              // [1]
                                   Vertices.GetSize(),
                                   p, num,
                                   mode);
     ImageValid = result;                                           // [2]

     if(!result)
        { /* failed */
         DWORD err = ::GetLastError();
         if(err != ERROR_SUCCESS)
            {/* show error */
             CRect r;
             dc.SetWindowOrg(0, 0);                                 // [3]
             GetClientRect(&r);
             dc.FillSolidRect(&r, RGB(255, 0, 0));
             CString s = ErrorString(err);                          // [4]
             dc.TextOut(0, 0, s);
            } /* show error */
        } /* failed */

    //****************************************************************
    // Highlight the point if active
    //****************************************************************
    // see discussion of the point finder for the code that goes here

     dc.RestoreDC(save);
    } // CGradientImage::DoGradientFill
void CGradientImage::OnPaint()
   {
    CPaintDC dc(this); // device context for painting

    int save = dc.SaveDC();                                     // [1]
    CRect r;
    GetClientRect(&r);
    CRgn rgn;                                                   // [2]
    rgn.CreateRectRgnIndirect(&r);                              // [3]
    dc.SelectClipRgn(&rgn);                                     // [4]
    dc.SetWindowOrg(org.x, org.y);                              // [5]

    DoGradientFill(dc);                                         // [6]
    dc.RestoreDC(save);                                         // [7]
   }                                                            // [8]
void CGradientImage::ToClipboard()
    {
     CClientDC dc(this);                               // [1]
     CDC memDC;                                        // [2]

     memDC.CreateCompatibleDC(&dc);                    // [3]

     CBitmap bm;                                       // [4]
     CRect r;
     r = BoundingBox;                                  // [5]

     CSize sz(r.Width(), r.Height());                  // [6]
     bm.CreateCompatibleBitmap(&dc, sz.cx, sz.cy);     // [7]

     int save = memDC.SaveDC();                        // [8]

     memDC.SelectObject(&bm);                          // [9]
     DoGradientFill(memDC);                            // [10]

     OpenClipboard();                                  // [11]
     ::EmptyClipboard();                               // [12]
     ::SetClipboardData(CF_BITMAP, bm.m_hObject);      // [13]
     CloseClipboard();                                 // [14]

     memDC.RestoreDC(save);                            // [15]

     bm.Detach();                                      // [16]
    } // CGradientImage::ToClipboard                   // [17]
![]()
